Any room has a roof, which, as a rule, has an inclined shape. It is this form that helps her not to succumb to the influence of precipitation in the form of snow or rain. A person can choose the slope of his roof on his own, thanks to the rafter system, which consists of beams. In this article we will talk about what a rafter beam is, where it is used, how to install it.
The roof is the top part of the building. It resists natural phenomena more than other parts of the building: the sun's rays, rain and melt water, heavy snow cover, strong gusty winds.
 Therefore, this design must meet the requirements of strength, all possible types of insulation, and roofing materials must have chemical and radiation resistance and be resistant to frost.
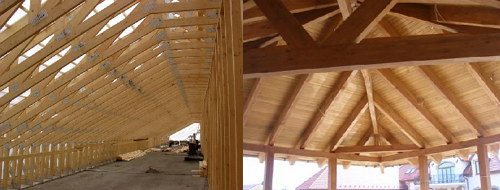
The main structures that withstand loads are composite beams and roof trusses.
Rafter beams are an indispensable part of the entire roof structure. It does not matter what material they are made of - wood, metal or reinforced concrete.
They are laid on Mauerlats and girders, having the form of rafters, which, in turn, are treated with antiseptics and laid on the walls.
They must be 45 centimeters from the top layer of the attic. Runs should be laid at a distance of three to five meters from each other and give them support on racks. Each of all the rafters is laid on these systems with a distance of two meters from each other.
The choice of rafters for roof structure depends on many factors: the slope of the roof, the roofing materials used, as well as snow and wind loads.
There are such types of beams, depending on the profile:
- single-pitched with parallel belts (a)
- with a broken or curvilinear upper chord (b)
- gable trapezoidal (c)

Shed rafters are used in buildings with small spans. Gable sloped rafters - in public and residential buildings that have clones or internal load-bearing walls.
Materials for the manufacture of structures (trusses):
- truss wooden trusses;
- metal truss trusses (aluminum or steel);
- reinforced concrete trusses;
- from polymeric materials.
Truss metal trusses are used:
- building coverage;
- masts;
- span structures of bridges;
- hydraulic gates;
- power line towers.
Truss truss reinforced concrete is used in the same cases as metal, that is, absolutely your choice.
Tip! Do not manufacture beams yourself. It would be better if you tell us all the data on your roof (angle of inclination, type of building, etc.) and they will be made to order for you. Since the workshops use professional tools, which will reduce the risk that the beam will be unusable.
Installation of the truss system
For the installation roof truss system You will need certain material and tools:
- Rafters, the size of which must fully comply with the design documentation. Usually this is a bar of size 100-200x100-200x4000-6000 mm;
- All kinds of waterproofing material (you can use the usual roofing felt.);
- Axe;
- Simple pencil;
- Boards - 6 pcs. , the size of which should be 25x4000-6000mm. The width will not matter, but not less than 100 mm;
- Mounting material: staples, metal nails (from 75 to 200), self-tapping screws (6-12 mm x70-150mm);
- Nail puller
- Hammer;
- Chainsaw (you can also use a hacksaw for wood);
- Level (1000 mm);
- Roulette (at least 10 meters);
- Drills (diameter 4-10mm (it all depends on the size of your staples));
- Drill.
Direct installation.
- Before starting work, you should clearly determine what type of construction of the truss system you will work with. Only after that start work. After the type of system is selected, you can begin installation. We will show the installation process using the example of an attic truss system, since metal trusses are rarely used in the construction of a residential building.
- A farm template is made from boards.
To perform this operation, we take two boards and connect their edges with a nail. That is, we get a design in the form of scissors.
Please note! To prevent the roof from being blown away by the wind, it is necessary to strengthen the rafters. To do this, each beam must be fixed with a wire twist not thinner than 4 mm, while fastening is carried out to crutches built into the walls, or to reinforced concrete floor elements.
- The next step is to install the free edges on the supports that will support our rafters in the future.
After the roof slope is selected, we fix the angle formed between the boards with the help of a transverse crossbar.
- Then the template is lowered onto the beams, where the angle of cutting the rafters is marked with a pencil.
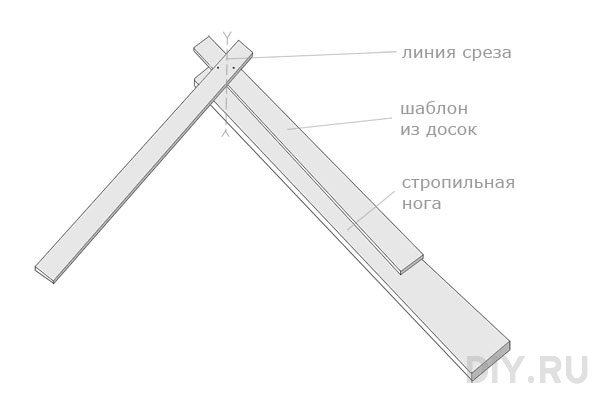
The template is made from boards. This facilitates the process of choosing the angle when installing the truss system.
To avoid loads when fixing the crossbar, which can easily break the desired angle, the crossbar should be fixed with self-tapping screws.
Pay attention! This moment is very important when installing the entire truss system, since the entire reliability of your roof depends on the quality of your template.
- The next step will be cutting the rafters according to the template and directly assembling them (see the diagram below).
Rafters should be assembled using nails, screws and a crossbar. At the crossing of the rafters, the best option would be to hammer in three nails, this will immobilize them.
Next, we raise the entire frame and install it on the base. Use the ladder to get to the top (observe safety measures!!!).
With a pencil, make marks on the base and on the rafters, in order to then make cuts with a chainsaw (wood saw). Use the same system to assemble another truss truss. (Note: the base is a beam measuring 15 * 15 cm).
- Then we install wooden trusses on the edges of our building and pull a cord between them, which will be a kind of level. Farms should be installed exactly perpendicular to the base, this parameter is controlled by the level.
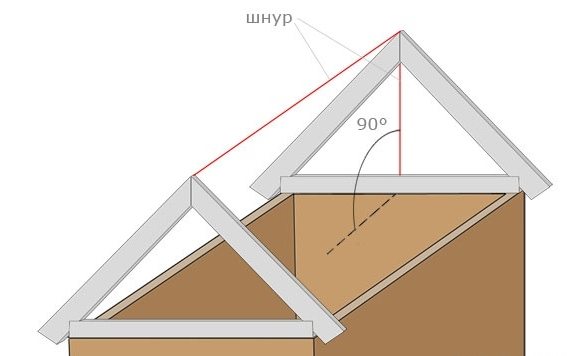
Farms, which are installed along the edges, are attached on both sides with subsupports installed at an angle to the rafters.
- After you have installed two rafters, we proceed to assemble the rest with an interval of 60-80 cm.
Tip! Assemble the structure on beams, this will allow you to facilitate the installation of new roof trusses.
At the end of the truss system should look like this:

It will be convenient to nail several boards between the rafters, in order to avoid their displacement relative to each other.
- At the final stage, you can install transverse strips and supports, perform all work related to fasteners with self-tapping screws, as they are more convenient and serve to better fix the rafters - the reinforcement of which we need.
Upon completion of the installation of the rafters, calmly proceed with the installation of the crate.
In order for the attic to be cozy and warm not only in summer, but also in winter, the walls should be sheathed with wood panels, and lay insulation between the rafters.
Did the article help you?