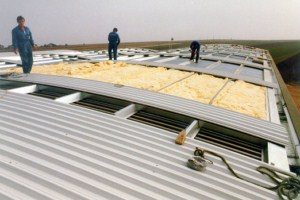
The walls of the house are built, now the question remains how to lay the corrugated board. "Why exactly corrugated board?" - you ask. Let's find out together why it is better to roof the roof with corrugated board.
Decking (or corrugated sheet, profiled sheet) is a roofing material that is a metal sheet. As a rule, it is used for roofing roofs, but it can be found used as a barrier.
 During production, each sheet is treated with a polymer and galvanized coating to protect it from external irritants.
Also, each sheet of material is subjected to rolling, as a result of which we obtain a wavy profile. This process is necessary because it is he who gives the material the necessary rigidity.
How to properly lay corrugated board so that there are no problems with its operation in the future? Everything is very simple! Use the information from this article, and the roof from the profiled sheet will serve you for many years.
Advantages of corrugated board
Installation of corrugated board on the roof of the building makes it possible, due to its low weight, to significantly save on a lightweight truss system.
Even if you have a small roof slope, then the use of corrugated board will be the best option, because it is guaranteed to protect the room during heavy rainfall.
Roofing from corrugated board can definitely be called the most economical option. Moreover, this material will be economical both for individual construction and for large facilities.
Due to the surface coating with polymers, we have a material resistant to corrosion. This factor plays a very significant role in determining the length of the operational period.
Due to the ease of processing, low weight and the ability to do everything yourself, a corrugated roof is no longer a curiosity.
Another advantage of installing a profiled sheet is that the roof can be laid at any time of the year, the sheets are very easy to cut, there is almost no waste left, and an amateur builder can also fix the corrugated board.
How to fix corrugated board
We turn to the most important thing, that is, to the question of how to lay corrugated board.
Before starting work, you should find out:
- The angle of the roof;
- Based on this, choose a crate;
- Determine the amount of profiled sheet required.
Having dealt with all the preparatory work, we proceed to the beginning of fastening the corrugated board itself.
Please note! The joints of the corrugated board in the direction of the slope must be overlapped, while the overlap must be at least 200 mm.
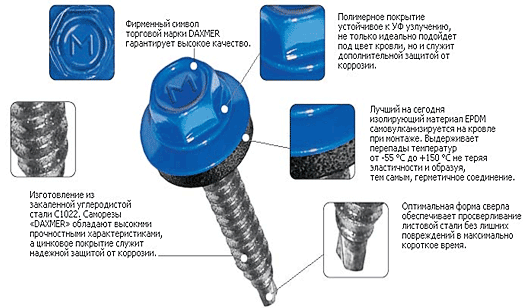
Installation of the profiled sheet to the wooden elements of the crate should be carried out with special roofing screws.
We recommend using self-tapping screws from foreign companies, such as SFS, Fischer, Hilli. The diameter of the selected self-tapping screws must be either 4.8 mm, or 5.5 mm, or 6.3 mm.
There are also certain criteria for the length, that is, it must be in the range from 19 to 250 mm. Fastening is made without pre-drilling holes.
It is also possible to use combined rivets instead of self-tapping screws. Such rivets are produced by the Kireevsky Plant of Light Metal Structures according to TU 5285-135-04614443-02.
Make calculations in such a way that, on average, per 1 m2 coating uses 6-8 fasteners.
If you look at the corrugated board - how to lay it is immediately clear, but there are certain nuances.
Generally accepted rules for installing a roofing profiled sheet:
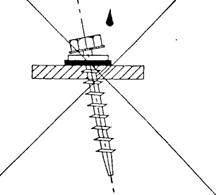
- the profiled sheet is attached only at the point of contact of the wave (unlike slate) to the crate. Details shown in the figure:
- fasten profiled sheets to the uppermost and lowermost lathing in each trapezoid (wave), because this part of the roof has the greatest loads (wind). As for the intermediate purlins, it is allowed to attach the flooring to them through the wave;
- at longitudinal joints, the installation step should not exceed 500 mm;
- from the side of the wind bar, attach the profiled sheet to each crate;
- for the best fit of adjacent profiled sheets, it would be desirable to shift the centers of fasteners in joined waves by 5 mm. Press the bottom sheet to the top sheet.
- When fastening the roof, one should not forget about vapor and waterproofing, as well as make a gap for ventilation of the space.

Consider the installation process in more detail in order to avoid incomprehensible moments.
How to lay corrugated board with screws? Very simple! Before installing the screw in the corrugated board, drill a hole, the diameter of which will be 0.3 - 0.5 mm larger than the diameter of the screw.
Further, the whole process is carried out as with self-tapping screws.
Then the question arises, how to lay corrugated board with self-tapping screws? The answer is quite simple:
- Firstly, the self-tapping screws are twisted exclusively perpendicular to the crate.
This is important! Try to stick to this rule, since improper fastening of self-tapping screws can lead to the appearance of a through hole in the roof.
- When tightening screws, it is best to use a screwdriver or drill. In this case, the rotation speed of the cartridge should be low.
Using a drill at the end, carefully drill through the metal with a self-tapping screw and fasten the profiled sheet. Due to the low rotation speed of the chuck, you can fasten the corrugated board even to the metal crate.
Should be remembered! Installation of corrugated board is not allowed with the help of nails, as the sheets can come off under the influence of wind.
At the junction of the corrugated board to all vertical surfaces (pipes, walls, etc.), joint strips should be installed.
In cases where the size of the profiled sheets does not match the size of the roof, then you can change its size using a jigsaw or cutting electric shears.
Pay attention! Do not use gas cutting, a grinder and do not try to weld profiled sheets - you risk ruining them, since both the polymer coating and zinc are burned out, which will invariably lead to corrosion.
Mounting process do-it-yourself corrugated roofs it is recommended to carry out in special "skis", which will protect the profile from dents and other damage.
If you are worried about condensation under the corrugated board and are wondering what to lay under the corrugated board to avoid this, then use an ordinary waterproofing film.
When finished, remove shavings and debris from the roof, touch up any scratched areas. After three months, it is necessary to tighten the screws, as they may weaken.
Now you can safely choose corrugated board for the roof - we have already sorted out how to lay it.
Did the article help you?