Many modern developers are often interested in the question of how to lay metal tiles: videos and articles on the Internet often do not represent step-by-step instructions, but, as a rule, are presented in the form of general reviews or terminological essays that are too complicated for an ordinary homeowner.
In this article, we will try to convey to the reader information about the correct installation of the material in the simplest possible language and in the sequence in which it is recommended to install a metal roof.
How to lay a metal tile? Naturally, after performing a qualitative calculation.
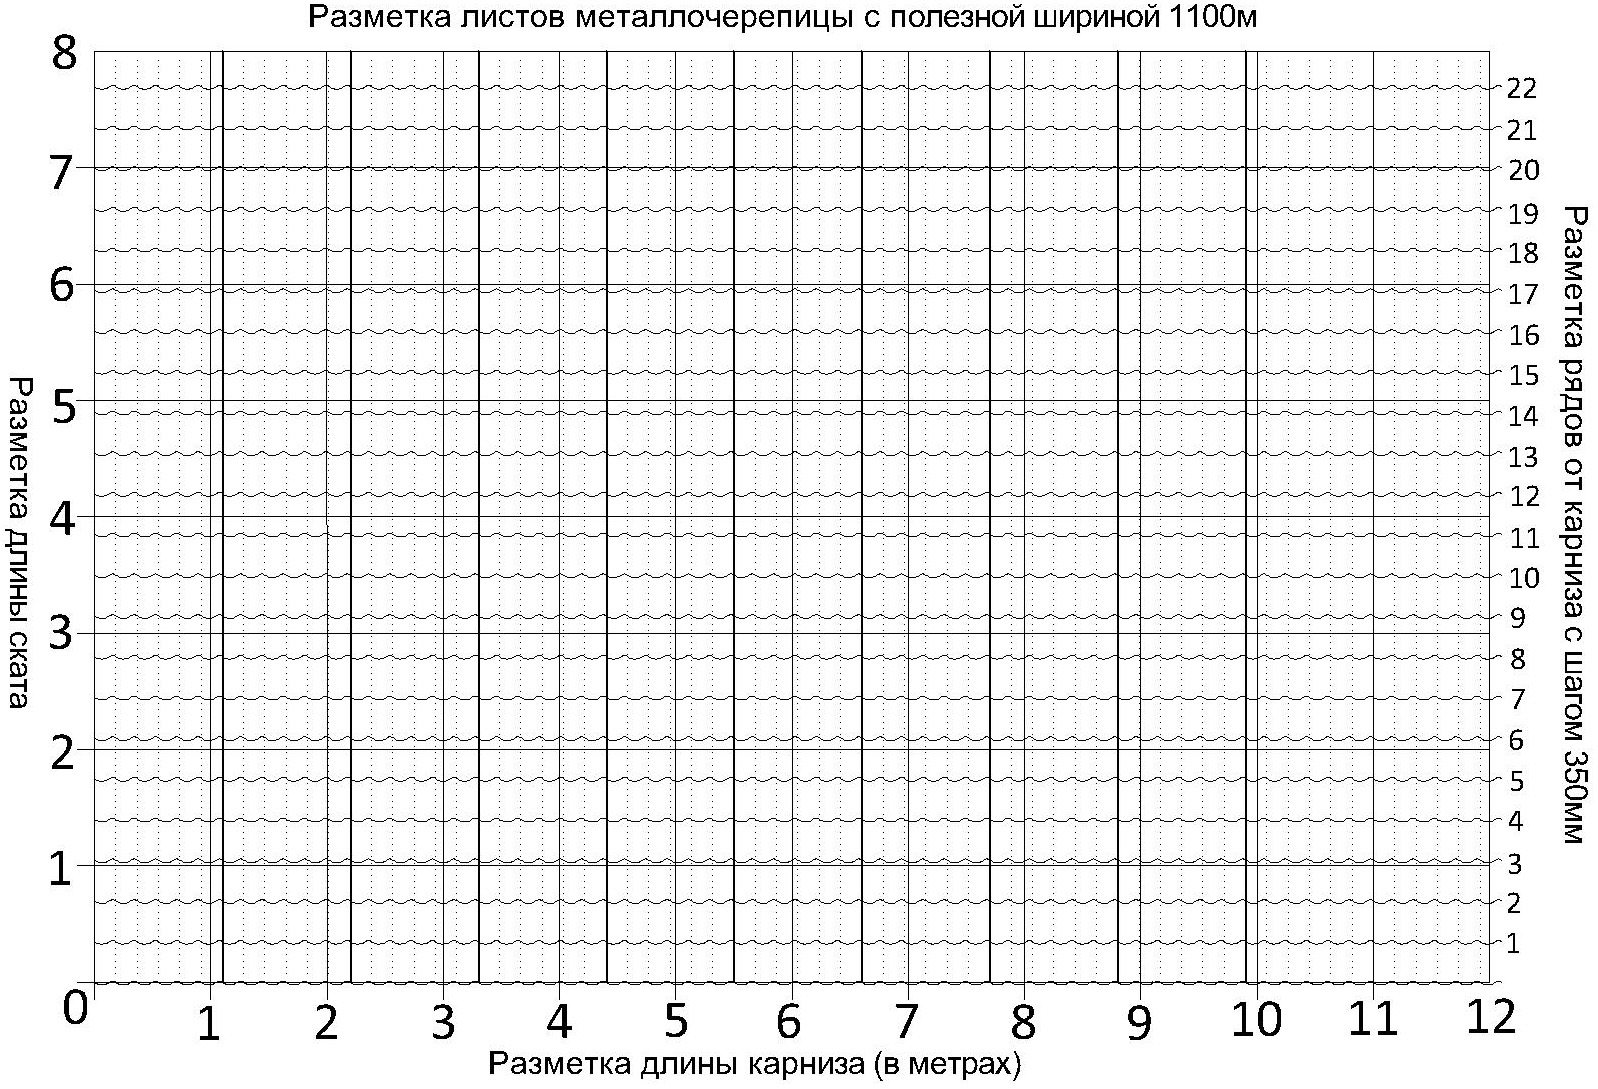
So, in order to calculate the number of required sheets of metal tiles for laying the roof, you need to do metal tile calculation, namely, it is necessary to divide the value of the length of the roofing slope by the useful width (excluding overlap) of the metal tile sheet.
Roof marking based on the usable area of metal sheets
This will determine the number of rows required to lay one row. Next, measure the width of the roof slope, add at least 40 mm to it per cornice outlet and divide the result by the useful length of the tile sheet, thereby finding out the number of required rows of tiles.
Then, multiplying the number of rows by the number of sheets in one row, the required number of sheets of metal tiles for the shelters of the specified roof slope is obtained.
Advice! The number of metal tiles for each slope should be calculated individually.
Roofing from a metal tile is subject to the formation of condensate from the inside, for this reason it is necessary to provide under-roof waterproofing and good ventilation:
The waterproofing carpet is mounted from the cornice to the ridge with an overlap, while a gap of at least 50 mm must be provided under the ridge to ensure the evaporation of accumulated moisture.
Waterproofing is laid directly on the rafters or logs and additionally reinforced with a counter-lattice laid along the rafters.
ABOUTgrating for metal roofing perform in such a way that air has the opportunity to penetrate without obstacles from the eaves under the roof ridge.
Ventilation holes are provided at the highest point of the roof.
Unheated attics are ventilated through the end windows.With a lack of natural ventilation, means of forced ventilation can be provided.
Before laying the metal tile, you will need to prepare a reliable base for the roofing:
When performing the crate, boards 30 * 100mm are used. They are mounted at a certain interval, which depends on what type of tile is used in the work. The pitch, as a rule, is from 300 to 400 mm.
When installing the crate, the board facing the eaves is chosen 10-15 mm thicker in comparison with the rest.
The lathing is fastened across the direction of the rafters with the help of self-tapping screws, screwing it to the bars of the counter-lattice.
The end plate is arranged above the crate to the height of the wave crest of the profiled sheet. It is nailed to the rafters with galvanized nails.
The cornice strip is attached before the installation of the roofing sheets. Fastening is also carried out with galvanized nails with a pitch of 300 mm.
For a more reliable fastening of the ridge bar, two additional bars of the crate are nailed onto it.
The process of installing sheets of metal
So, how to lay a metal tile correctly, we will tell in the form of the following rules:
In some cases, cutting sheets of metal tiles is required. To do this, use special scissors or hacksaws for metal.
They begin to cover the gable roof from the end, while the hipped roof - on both sides from the highest points of the slope.
Metal tile flooring starts from both the right and left ends, providing for an overlap along the length of the slope in one wave.
The edge of the sheet is set parallel to the cornice and fixed with a protrusion of 40 mm relative to it.If the length of the sheets corresponds to the width of the slope, then it is recommended to fasten three or four sheets to each other, then fasten them on the ridge with one screw, followed by alignment strictly along the eaves and fastening already along the entire length.
Self-tapping screws equipped with a sealing washer are screwed into the deflections of the waves of profiled sheets under the transverse fold. For each square meter of coating, there should be approximately 8 such screws. As for the edges, the sheet is attached to them in every second recess of the waves.
The overlap along the length of the sheets is about 250 mm.
Advice! Before you properly lay the metal tile, you should understand that it is not recommended to cut the material with a grinder. This tool leads to strong heating of the sections at the cutting site, which can lead to a violation of the protective layer of the material and, as a result, to corrosion of this place during further operation.
Cutting sheets with an electric jigsaw for metal
Places of overlaps and through holes are recommended to be treated with silicone sealant.
With a cold roof, when there is no roofing cake, as such, sealing tapes can be used as additional waterproofing, which are laid under the ridge and other joints of the metal tile.
For the device of internal joints, a standard groove bar is used. The overlap of sheets on the plank is usually at least 150mm, and the seams require additional sealant treatment.
Snow guards are attached under the second transverse decorative fold starting from the cornice, approximately 35 mm from it. The snow holder is fastened with large screws through the sheet to the crate beam.The lower edge of the element is connected to the profile sheet on every second wave in the same way, but with screws of the usual size.
The installation of elements passing through the roof (various kinds of communications) is carried out according to the instructions that are attached to the installation kit for this element. Each gap between the roofing sheets and the passage elements is carefully sealed. Heavy elements are fastened to the crate.
On this, the instructions for the installation of a roofing deck made of metal tiles can be considered completed. By strictly following these rules, you will definitely achieve the desired result - you will get a reliable and durable roof.
 Many modern developers are often interested in the question of how to lay metal tiles: videos and articles on the Internet often do not represent step-by-step instructions, but, as a rule, are presented in the form of general reviews or terminological essays that are too complicated for an ordinary homeowner.