When installing a roof made of ondulin, upon completion of the installation of the roof truss structure, they proceed to the installation of the crate - a wooden base, to which the sheets of the so-called euroslate are directly attached. In this article, we will consider the installation technology of French roofing material and dwell in more detail on the consideration of the device of such a structural element as an ondulin crate.
Rules for the installation of crates for ondulin
 Before proceeding with the implementation of this structural element of the roof, it is necessary to arm yourself with a carpentry tool, prepare slate nails, a waterproofing film, a wooden edged board 25 mm thick and beams with a section of 45 * 50 mm.
The crate for ondulin is installed according to the following rules:
- Ifroof slope goal fluctuates within 5-10 degrees, the crate is made in the form of a continuous flooring of moisture-resistant plywood or boards. The overlap of each subsequent row on the previous one is 300 mm, while the side overlap is carried out with an overlap of two waves.
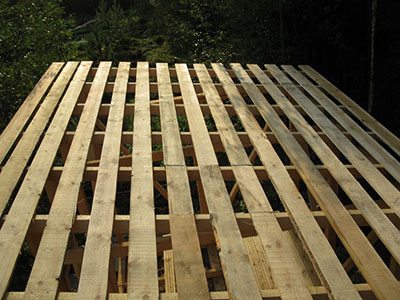
- If the slope angle is from 10 to 15 degrees, the roofing lathing is arranged parallel to the eaves of 45 * 50 mm beams with a set step between the central axes of the beams, which is 450 mm. In this case, the overlap of the overlying ondulin sheets should be 200 mm, and the side overlap - per wave.
- When the slope angle exceeds 15 degrees, the crate is mounted from bars of the same section, however, the step between their axes is 600 mm, while the top row is set with an overlap of at least 170 mm. Lateral overlap in this case should be carried out in one wave.
- In order to maintain the required spacing between the base beams for ondulin, the crate may require the use of a wooden template. The fastening of the bars under the ondulin to the rafters is carried out using self-tapping screws in case it is necessary to correct irregularities in the plane of the rafters.
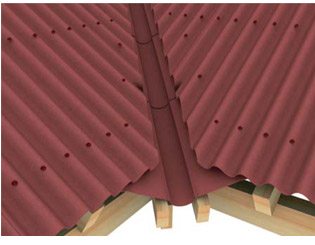
- At the place of installation of the roof ridge, as well as the valley, additional lathing bars are installed for the possibility of their fastening, and a 50 * 100 mm board is mounted at the points of vertical junction of the roof sheets.
Necessary funds for the installation of an onduline roof and preparation for installation
To install a roof made of ondulin, you will need the elements of a valley, a ridge, a tong, which are included in the supply of roofing material.
If the design of the roof involves the adjoining of the roof to the wall, then it will be necessary to use a covering apron.
You may also need a special insulating self-adhesive tape "Onduflash" in order to connect waterproofing sheets.
In addition, for the installation of a reliable vapor barrier under the roof deck, the roofing slab manufacturer recommends using the special material Ondutis R70.
In addition, for installation, slate nails or self-tapping screws equipped with sealing rubber washers will be required without fail.
The pre-installation preparation must necessarily include checking the geometry of the roof. A similar check is made using twine, which is pulled along the ridge and cornice.
In the event that the diagonals of the rectangle of the roofing plane are not equal, they will need to be adjusted.
Before installation, it is necessary from below roof overhang knock out an additional bar to the batten beams and attach wind boards to it using self-tapping screws.
Instructions for installing a roof from ondulin
The general rules for installing the material are as follows:
- When installing the roof, it is not recommended to walk on the material without special safety devices, and you should move along the coating by stepping on the crests of the waves, and not between them.
- Installation work should be carried out at temperatures from -5 to +30 degrees.
- It will be better if the sheet is fastened to the crate using at least 20 nails. This will ensure that no wind blows the roof of your house.
- Sheets should not be stretched. They must first be laid evenly and only then nailed.
- The desired size or shape of a sheet of roofing material can be given with a knife, hacksaw or jigsaw, periodically lubricating the tool with oil.
Advice! When laying ondulin, you should strictly follow all the recommendations presented in the instructions that the manufacturer attaches to the material.
- The material is laid and fastened to roof lathing, starting at the opposite edge of the windward side of the roof, with an overlap of 125 mm.
- The second roofing row starts with half a sheet, which will provide an overlap of 3 sheets at the corner joint and, therefore, facilitate the laying task.
- Ondulin is nailed along all waves, not only at the ends of the sheets and end overlaps, but also from the sides of the side overlaps. The coating is nailed to the intermediate bars in one wave.
- When making a roof gable, the edge of the ondulin sheet is folded over and nailed to the gable board. This operation, if possible, should be carried out at a positive temperature.
- The side joint with the wall can be made out by installing a valley. In this case, the joint must be carefully waterproofed.
- At the end joints, a covering apron is used, which is nailed to each wave. The joints formed in this case are covered with waterproofing mastic.
- With a large slope of the roof, a dormer window may be provided. Its frame is nailed at the joints with sheets of material for each wave. The top sheet is overlapped over the base of the window.
- In order to eliminate the gap both on the eaves and between the roof and the ridge element, a cornice filler is used.
- The outlet of ventilation ducts is made out by means of a ventilation pipe nailed along each wave, and the top sheet is fixed above the base of this pipe.
- If a metal crate was used, the ondulin is fixed using roofing screws screwed in with a socket head, which is inserted into a screwdriver.
Did the article help you?