Gutter systems are an integral part of protecting the roof of a house from excessive moisture. Their main function is to remove all types of precipitation from the pitched roof as quickly as possible. In our article, we will talk about how to install a gutter system with your own hands according to all the installation rules, so that it lasts the maximum period and fulfills its main purpose without repair and breakdowns.
Depending on the manufacturer, proper installation and compliance with operating conditions, most drainage systems can last from 5 to 12 years.
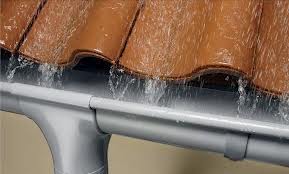 In fact, very often you can see the following picture: the drainage system was installed not so long ago, but has already failed or has damage that negatively affects the performance of its main function - removing moisture from the roof.
How to install gutters correctly so that they last the entire period declared by the manufacturer and even longer?
Important to know: there are throughput calculations roof drainage system. If they are made correctly, then your gutter system will cope well with the load and remove moisture and water from the roof in advance.
Accordingly, excessive moisture will not linger on the roof, it will be less susceptible to corrosion and leakage. As a result, such a roof will not cause home owners the hassle of repairing it or (even worse) completely replacing the roofing.
The main types of drainage systems
There is a classification of drainage systems depending on:
- the material from which the drainage systems are made;
- gutter diameter;
- pipe diameter.
The simplest and least costly in terms of finance is the gutter system, which is made of galvanized metal (metal sheet thickness 1-2 mm). Such drainage systems are not in short supply today, they can be purchased at any construction market.
The main advantages of this drainage system:
- Ease of installation. You can even do it yourself, without outside help.
- The most budget option for drainage.
- Durability.
- Perfectly complements the overall look of old and reconstructed houses (including country-style ones).
Important to know: pipes and gutters must be of the same size. When buying, do not forget to pay attention to their labeling. Subsequently, this will facilitate the installation of the entire drainage system.
Plastic gutters - the installation of which is also quite realistic to do with your own hands, are no less popular. And the offers of the modern market are very diverse.
Most manufacturers produce competitive products of different sizes, which suits homeowners quite well, as it facilitates the process of calculating the drain and choosing the necessary structures for a particular house.
The cost of many plastic gutters is predetermined by their polymeric material. Therefore, you can purchase both a budget option and a more expensive one.

The main advantages of the plastic drainage system:
- Ease of installation. With such drainage from the roof it is quite possible to cope on your own.
- Excellent decorative quality.
- Durability of the structure.
The main disadvantages of a plastic drainage system:
- Fragility.
- Improper installation may change the shape and color.
- Low resistance to ultraviolet radiation.
The correct choice of the material from which it will be made depends on how to install the drain correctly, so that it is reliable and performs 100% of the function assigned to it.
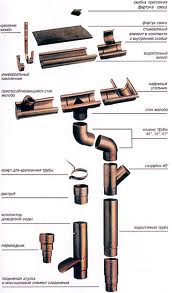
The most reliable, but at the same time the most expensive, is a metal gutter system in a polymer film. Thanks to the metal gutter for roof keep its shape securely. Due to the polymer film covering the metal, such a drain is the least susceptible to corrosion.
What is important: modern manufacturers produce a huge range of colors of the polymer film. Therefore, it is quite easy to choose its color, which will complement and harmonize with the general view of the architectural development.
Calculation of elements for the drainage system of the house
How to calculate the drainage system depends on its functionality and operating time.
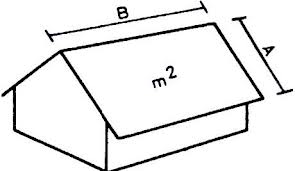
In order to calculate the diameter and length of the entire gutter system at home, you need to know the following dimensions:
- The height of the house.
- Roof area.
You also need to correctly calculate the diameter and length of the gutter.
Important to know: The gutter has a certain length. Therefore, the required number of gutter pieces will be a multiple of its length.
A little advice: if the area of the house is more than 100 square meters. m., then purchase a gutter with a maximum diameter.
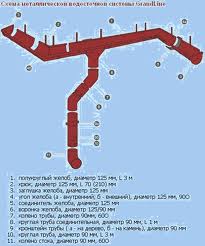
How to properly install gutters, for example, for a house whose walls are 4.5 m high and one slope has a roof width of 9 m? To do this, you will need the following elements of the drainage system:
- 3 pcs. gutter, each 3m long;
- Right gutter cap.
- Left gutter cap.
- 2 pcs. funnels.
- 16 pcs. brackets for fixing the gutter.
- 4 things. drainpipe (its diameter is 3 m).
- 2 pcs. pipe fittings.
- 10 pieces. fastening pipes to the wall.
- 6 pcs. pipe turns (angle 45 degrees).
Required tools for installing the drain:
- Construction knife.
- Perforator.
- Construction level.
- Marker.
- Drill.
- Plumb.
- Bulgarian.
Step-by-step instructions for installing a drainage system
To install a drain, regardless of its size and the material from which it is made, you need instructions for installing drains.
Performing it step by step, you can install a high-quality drain with your own hands.
So, step number 1 is the installation of fasteners for the gutter. There are several types of fastening, depending on them, it can be installed on a wall or on a roof truss structure.
Important to know: set the required slope towards the downpipe (a few degrees). Such a measure will allow the water to go into the pipe as quickly as possible and relieve overflows through the edges of the gutter. Accordingly, there will be no leakage and wetting of the roof and walls of the house.
The brackets should be evenly distributed along the wall, the distance between them should be from 500 to 600 mm.
Installation + plastic drains on the truss structure is best done like this: attach the brackets to the structure of the truss system to each filly with special self-tapping screws. The easiest way to do this is with a regular drill.
In those places where pipes for the drain will be installed, you need to install special water intake funnels. In the event that the installation of plastic gutters involves the use of water inlets as a connector for the gutter, you need to start work with their installation.
Recall that at the ends of such funnels there are specially equipped devices - a place where glue or rubber seals are applied (for a metal drain). These funnels with the help of brackets must be fixed to the roof structure.
So, the brackets are securely fixed, proceed to the next step of our instructions.

Step number 2 - arrangement of a water intake funnel. Before mounting the gutter, you need to cut a hole in the place where the water intake funnel is attached and apply a contour on the gutter for the future funnel.
Using a fine-toothed hacksaw, cut a hole, clean the edges. In order to attach a funnel made of plastic, you need a special glue.
You can buy it at any hardware store. Metal systems are fixed with a special clamp (it is available on the front of the gutter and funnel).
Step # 3 - installation of a gutter.
Important to know: the first mount must be installed directly under the pipe elbow at forty-five degrees, directing the pipe to the funnel. To do this, you need to measure the distance (using a tape measure) and cut the necessary piece of pipe with a construction knife or grinder.
Plastic drains must be fastened in increments of 50-60 cm, metal - from 70 to 150 cm. Fastening must be done with a slope of the grooves towards the funnel by 2-3 mm.
Many builders prefer to assemble the gutters together with plugs and funnels right on the ground, then lift them up and install them on brackets. We do not recommend doing this work yourself.
At a minimum, two pairs of hands and two ladders are needed to start climbing from both sides at the same time.
Therefore, it is better to assemble the system at the top. Moreover, the installation of plastic drains is not particularly difficult, the assembly is easy to perform, remembering how a designer was assembled in childhood - such a semblance of assembling modern drainage systems.
It is equally important to know: the drain + how to install it correctly in order to evenly distribute all the fasteners along the wall.To do this, you need to maintain a step from 800 to 1000 mm.
A word of advice: pre-prepared holes in the wall will help securely attach the brackets to the drainpipe. They can be drilled with a hammer drill.
You can check how correctly the vertical brackets are installed using a plumb line.
The final stage - we measure the required size of the pipe, cut off its excess part and fix the pipe on the wall.
In order for water to be drained from the foundation and walls of the house, we recommend putting a turn on its lower end and adding a small piece of pipe.
How to ensure the drainage of water from the foundation
The timely removal of collected water from the foundation of your house also depends on how to properly install the drain. To do this, we recommend equipping a small storm water inlet.
You need to install it in the place where water comes out of the drainpipe. To do this, you will need polymer pipes, the end of which can be led directly to the street or to the filter well.

As an option for arranging a storm water inlet, you can consider a pit. It can be purchased ready-made in hardware stores or concreted with your own hands. A cheaper option is to make a pit yourself.
In order to equip the storm water inlet, from where water will flow into the filter well, you will need the following building materials:
- 1.5 m3 fractional (from 5 to 20) crushed stone.
- 0.1 m3 sand.
- 50 kg of cement.
- Formwork from wooden boards.
- Sewer polymer pipe (it is needed for use outside the building). Its length is needed based on the size of the suburban area.
- The grate is welded. Its size depends on the size of the storm water inlet.
- Water.
Depending on how to make a drainage system, you can almost 100% protect the foundation of the house from possible wetting.
To do this, it is very important to determine where the storm water inlet will be located. When choosing such a place, you will need wooden pegs for basting on the ground.
We recommend the following dimensions of the storm water inlet:
- Internal size - 300x300mm;
- Outer size - 400x400 mm (considering the thickness of the concrete wall);
- The depth of the pit is 600 mm.
An equally important and time-consuming stage of this work is digging a trench in order to lay a drainpipe.
Important to know: the width of the trench should be equal to the width of the shovel. The depth of the trench should go with some slope (at least two degrees) away from the pit to the filter well. This will allow you to quickly divert water from the foundation of the building.
At the end of the trench, you need to dig a pit to equip the filter well. We recommend its optimal size: 1000 mm by 1000 mm, one meter is enough depth.

Now you can start laying the pipe in the trench, its end will protrude 50 mm into the equipped pit and 500-600 mm into the filter well.
A little advice: in order to prevent voids from forming, fill the pipe with soil and pour water.
After the pipe has been laid, we proceed to concreting the storm water inlet. To do this, we make formwork from boards, install a special reinforcing mesh, plug the hole in the pipe with a film. We knead the mixture of concrete and pour it into the equipped form.
In order for concrete to gain strength, it will take some time.At this time, you can do the arrangement of the filter well.
Given the fact that rain and melt water entering the well does not need additional purification, it is quite enough to simply fill it with rubble, sprinkling it (200 mm thick) with garden soil on top.
A little advice: in order for the concrete not to dry out and crack in the first two weeks, shade this place. After a day, the formwork can be removed. But the concrete will fully harden only after a week.
We install the grate on the storm water inlet, we direct the drain pipe into it. All work completed. In our article, we talked about how to properly install a gutter system with your own hands, following the instructions step by step.
Did the article help you?