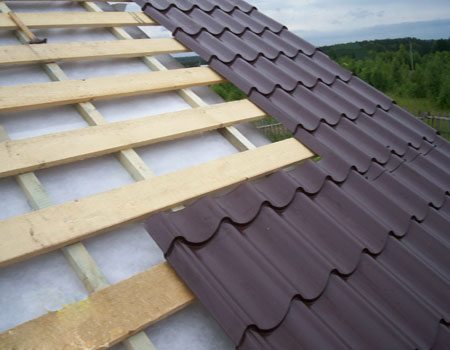
 About how to lay a metal tile - the video has already been shot enough. However, few videos can boast of a full disclosure of this topic. In our article, we will try to fill this gap by telling the reader about all the nuances associated with laying this roofing material.
Rules for fixing metal tiles
To begin with, consider the general concept of fastening metal tiles in the form of the following set of rules:
- a sheet of material is fixed in places of its contact with the crate in the deflection of the wave;
- to the first bar of the crate, the sheets of the lower row are attached through the wave above the step;
- to other bars - as close as possible to the step from below;
- from the side of the end board, sheets are fastened in each wave;
- each sheet is attracted to all the bars of the crate;
- in places of overlap in order to fix the vertical overlap, the sheets are fastened together by means of short (19 cm) self-tapping screws for metal tiles in the fall of the wave.
Advice! When storing sheets of metal, it is recommended to lay them with wooden slats. Transfer the sheets one at a time, wearing protective gloves and grasping their edges along the length.
Rules for installing self-tapping screws
Self-tapping screws are screwed tightly into the sheets of metal tiles, while not completely pressing the seal gasket.
Along the perimeter of the roof slope, fasteners are installed in the deflections of each wave. Then fastening is carried out to each bar of the crate with the arrangement of self-tapping screws in a checkerboard pattern.
When the screws are as close as possible to the step of the wave, they become barely noticeable, since they are located in the shade. They are screwed into the overlaps of the sheets of metal at an angle, which provides a better pulling of the sheets to each other.
On average, the consumption of self-tapping screws when fixing the roof is 6-8 units. per sq.m. and 3 units. per linear meter accessories for each side.
The use of self-tapping screws without a washer equipped with a special rubber band, or non-galvanized self-tapping screws, can lead to moisture penetration under the roof, corrosion of metal tiles, and a decrease in the strength of fasteners.
Incorrect fastening of self-tapping screws leads to loosening of fasteners, loose fit of roofing sheets to each other and the appearance of a noticeable seam
Accessories are fastened in all transverse waves with a step of 35 mm or in the longitudinal to the upper ridge through one wave.
Advice! For screwing in self-tapping screws, it is most convenient to use a screwdriver or drill with a low speed mode.
Rules for working with roofing sheets
When cutting sheets of tiles, an electric jigsaw with a blade for metal, a hacksaw or metal shears (electric or manual) are used.
It is forbidden to use an angle grinder with a nozzle in the form of an abrasive wheel - the coating loses its anti-corrosion qualities due to its burning through and sticking to the coating of metal chips.
The use of an angle grinder in the process of cutting profiled sheets with a polymer coating leads to burning out the galvanized layer at the cut point, which increases the corrosion rate and exfoliates the polymer coating.
In the process of cutting sheets of metal tiles, spray cans of paint will be required to tint the cuts, damage, and scuffs of the polymer coating that result.
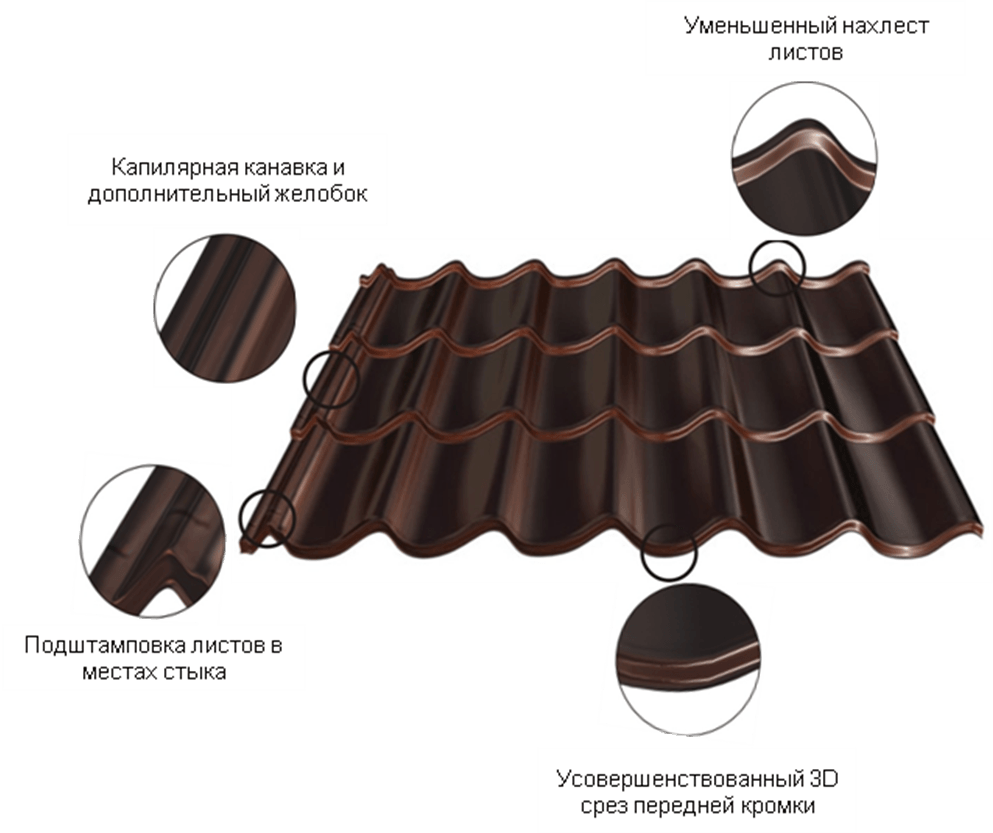
At the intersections installation of metal tiles between sheets during rain, a capillary effect can occur - moisture seeps through, rising above the level of the drain between sheets tightly pressed against each other.
To avoid the occurrence of such an effect, a capillary groove is made on each sheet of metal tile, which ensures free flow of water that has penetrated under the sheet.
Metal tiles are produced with a single and double groove, located on both the left and right sides. The capillary grooves of the sheets are covered with subsequent sheets.
Performing the installation of roofing sheets

Consider how to properly lay the metal tile:
- When installing sheets, especially when laying them in multiple rows, up to 4 x sheets of 0.4-0.5 mm thick are joined. When they are superimposed in one row on top of each other, the sheets get an increasing displacement (on a 10m cornice - up to 3 cm). For this reason, it is best to lay the material with a slight counterclockwise rotation (clockwise if the capillary groove is on the right side). Moreover, it is necessary to strive so that the right (or left) corners of the roof sheets in one row are located on one straight line. The value of the displacement of the tile sheet during rotation is 2 mm.
- The sheets are laid at the end of the laying of the first sheet in the direction both to the left and to the right of it. The main criterion in choosing a direction is the convenience of installation. As a rule, it starts from the side where there are no cuts, bevels, providing for the need for trimming the sheet, and is performed towards the junction with another slope (to the valley or oblique ridge between the slopes).
- When assembling with sheet slipping, to close the capillary groove, the edge of the next sheet is placed under the wave of the pre-installed one. This slightly facilitates installation, since the sheet is thereby fixed by another metal sheet, while preventing the latter from slipping. But this installation option promises a high probability of damage to the coating.
- Regardless of the complexity of the slope geometry, tile sheets are aligned in a strictly horizontal position along the eaves line and with an overhang recommended by the tile manufacturer.The general rule for each type is the following: sheets are assembled into a block of 2 to 4 sheets, fastening them to each other with short self-tapping screws, and fastened as high as possible with one self-tapping screw to the crate. Thus, it becomes possible to rotate the entire block relative to this self-tapping screw and align the sheets along the side edge and the eaves of the ramp.
- When installing tile sheets in several rows, the first sheet is laid from right to left, aligning it along the end and cornice, then a second sheet is placed on top of the first one, temporarily attached to the ridge with one self-tapping screw in the center of the sheet, both sheets are aligned and fastened together with self-tapping screws. The joint of the lower and upper sheets is fixed to the top of the wave with screws through the wave.
A third sheet is laid to the left of the first sheet and fastened together, after which a fourth sheet is placed above the third sheet and connected in the upper part of the overlap without fixing to the crate, with the possibility of joint rotation relative to the self-tapping screw, which holds the 2nd sheet at the roof ridge.
Then the block is aligned along the end and cornice, the sheets are finally fixed to the crate. Upon completion of the flooring of the first block, consisting of 4 sheets, lay out and attach the next block to it.
Installation of a metal tile on a slope of a triangular shape
Perform the procedure in the following sequence:
- Before starting installation, mark the center of the slope and draw an axis along it. Next, a similar axis is marked on the tile sheet and the axes of the sheet and slope are combined. Fix the sheet with a self-tapping screw on the ridge. On both sides of it, laying continues according to the principle described above.
- On the triangular slopes of the roof, on its oblique ridges and in the valleys, cutting sheets are required.For more convenient marking of sheets, a special “devil” is built: they take 4 boards, 2 of which are laid in parallel, and then fasten them across with the rest of the boards. Fastening is provided by articulated, not rigid. A distance equal to the working width of the roofing sheet is provided between the outer side of the right “devil” board and the inner side of the left.
- When working with a tool, the sheet prepared for cutting is placed on the already laid one. "Chartok" is placed on one side in the valley or on the ridge of the roof, outlining the cut line on the other. When marking the cutting line, the transverse boards of the fixture are placed in a strictly horizontal position.
- Sheets placed on the valleys are marked in the same way. At the end of the laying of the whole sheet, a sheet is mounted on top of it that requires trimming. "Chartok" is installed by turning the hinged boards. The inner side of the vertical board is placed on the valley, while the transverse boards are installed horizontally.
After providing the specified conditions on an unfixed sheet, a marking line is drawn. It is applied along the outer side of the second vertically standing board, while lying on the valley. The sheet is removed, cut according to the markup and placed next to the attached sheet. Installation of subsequent sheets of metal tiles is carried out in a similar way.
Device through exits and dormer windows
The device of through exits in the roof is carried out with the help of special passage elements, which ensure the tightness of the passages. Installation of such elements is carried out according to the instructions attached to them.
The places of passage through the layers of steam, heat and waterproofing are sealed with adhesive tape, while the joints between the elements are filled with silicone sealant. As a rule, sealant and tapes are included in the delivery of the feed-through elements.
The processing of protruding dormer windows is carried out by analogy with the processing of joints between the slopes. First, the lower valleys are laid, after the tiles, and then the upper valleys.
Since there is a possibility of moisture seepage between the metal-tile sheets and the upper valley on the slope of the dormer window, a universal or porous self-expanding sealant is necessarily placed in the assembly.
The lower valleys are slightly led out of the gable line in order to provide drainage. The upper valleys are subject to pruning.
So, we have considered the rules for laying metal tiles on roofing slopes of various shapes, so we hope that now having bought a metal tile - how to lay it, you will have a complete idea.
Did the article help you?