Ondulin roofing has recently become more widespread due to its attractive appearance, reliability and other positive qualities.
This article will discuss how to cover the roof with ondulin with your own hands and what is required for this.
 Before talking about how to cover the roof with ondulin, it should be clarified that ondulin is a roofing material in the form of bitumen sheets. This is a material of organic origin, made from cardboard pasted over with bitumen on both sides with various additives.
Ondulin is a very light, wavy material with some roughness, which, after laying, is dyed to the desired color.In order to cover the roof with ondulin efficiently and reliably, you should be aware of its main positive and negative characteristics.
Benefits include:
- Ease of installation that does not require special knowledge and skills;
- Convenience in storage and transportation, provided by the low weight of ondulin sheets.
The disadvantages of the material include:
- susceptibility to burning;
- need for fulfillment roof battens to avoid deformation of the sheets;
- maintenance and repair work is difficult, since bitumen is a rather fragile and very plastic material.
At the moment, the market offers a wide range of different roofing materials, such as slate, metal profiles, roofing material, corrugated board, different types of tiles, but ondulin is the most widely used. Knowing how to properly cover the roof with ondulin, it can be made light, durable and beautiful.
Useful: many pay attention to the external similarity of euroslate and ondulin. In fact, euroslate is a slightly modified ondulin with the addition of certain impurities, produced in various ways. Corrugated euroslate sheets are made from cellulose or fiberglass, coated with bitumen, after which they are painted in different colors.
The procedure for laying these materials on the roof is quite convenient and uncomplicated. During rain, like a metal roofing, euroslate and ondulin do not make noise, but fade over time under the influence of sunlight. At present, the production of ondulin in many countries is on the rise, its price is relatively high, but its service life reaches 50 years.
Let's move on to how to properly cover the roof with ondulin. This is done in approximately the same way as slate coating, without the use of special skills and tools. If the roof already had a coating such as metal, flat slate or roofing felt, it is not necessary to remove it, it is enough just to make a slight deformation of the ondulin sheets.
At the same time, they can be laid on any surface, regardless of their curvature. For fastening to the sheets, special nails are attached, equipped with gaskets, conspicuous after the installation of ondulin. Instead of these nails, it is recommended to fasten the material with screws or self-tapping screws.
When laying ondulin, a crate is also required, since by itself it does not provide sufficient rigidity and can sag or even break if there is no crate. If you don’t know how to calculate ondulin on the roof, sheets that turn out to be too large can be cut with a hacksaw or a jigsaw.
Ondulin crate
Manufacturers recommend using a solid crate under ondulin so that the material does not sag as a result of heating sheets in the summer and for even distribution of snow masses in winter.
First you need to learn how to properly markup on ondulin sheets, which is rather inconvenient due to their waviness. To do this, you can use standard pencils, a straight line can be drawn using another sheet.
To cut the sheet along the line, you can use a grinder or a hacksaw for wood, periodically lubricated with oil to prevent jamming.
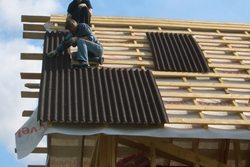
The weight of the sheets, not exceeding six kilograms, makes it quite easy to lift them onto the roof, and also ensures a fairly low weight of the entire roof in the end result. The laying of the roof starts from the edge of the lathing, and for the most reliable fastening, sheets should be nailed in each wave, while on one sheet ondulina it will take about twenty nails.
Nails for installing ondulin coating

To fasten ondulin, special nails are used, the base of which resembles screws, which ensures their reliable fastening in wood. The upper part of the nail is equipped with a rubber gasket, the color of which matches the color of the sheets, this gasket provides additional waterproofing at the attachment points.
At the junction of the material with a wall or other vertical plane, special valleys are used; waterproofing in these places should be done especially carefully. If there is a chimney in the house, special rubber aprons are used to ensure the correct joint when lining it with ondulin.
In order to cover the roof with ondulin in the most qualitative and reliable way, all joints must be carefully processed, providing effective waterproofing that prevents the negative effects of rotting and moisture on the roof frame.
Basic rules for laying ondulin

To ensure high quality and long service life of the roof covered with onduline, you should know the various rules and subtleties of laying this material, as follows:
- If it is necessary to walk along the laid undulin in the process of performing work, one should step on the crest of the wave, since the space between the crests will not support the weight of a person.
- Ondulin laying should be carried out at ambient temperatures ranging from -5 to 30 degrees, if the temperature is not within this range, it is recommended to postpone laying to another day.
- At least twenty nails that come with the sheets should be spent on fastening one sheet of ondulin.
This is done so that the coating can withstand gusts of strong winds. If laying is carried out by hired workers, the correct fastening should be checked. - Ondulin crate made of bars with a section of 60x40 millimeters.
The step of the lathing, which directly affects the service life of the roof without repair, depends on the angle of the roof:
- With a slope of less than 10 °, a continuous crate is made of OSB boards or plywood;
- With a roof slope of 10 to 15 °, the step should be no more than 450 mm;
- With a slope greater than 15 °, the maximum value of the crate step is 610 millimeters.
Ondulin also has the ability to stretch, which many workers try to take advantage of: in order to reduce work time, they nail the most stretched sheets to the crate.
With this work, after some time, waves appear on the roof surface, the only way to eliminate these waves is to completely cover the roof. To avoid such troubles, you should make sure that the ondulin sheet is in good condition before nailing it.
When laying the sheet, everything should also be carefully measured, especially overhangs, too long of which can lead to deflection of the undulin, which will make the appearance of the entire roof unattractive. Too short a length of light will cause precipitation and various debris to fall under it.
In addition, as already mentioned, the requirements for the lathing step should be carefully followed, any mistake made, even just a few millimeters, can cause premature repair of the entire onduline roof as a whole.
Before you start installing the onduline roof yourself, you should carefully study all the available information on its installation, in addition to reading this article, you can also talk about this with friends and acquaintances who have dealt with this coating.
The correct implementation of all the rules and requirements during the construction of an onduline roof will, first of all, save time and money for unnecessary repairs of roof flaws made during its installation. Thanks to our article, you have gained the necessary knowledge to learn some practical subtleties on how to cover the roof with ondulin - the video can be found on the Internet.
Did the article help you?