Due to its excellent decorative properties, high quality, durability and moderate cost, metal tiles have won a special niche in the market of roofing materials. The color gamut of the material is also important and wide, which allows you not to limit the creativity of designers and architects, allowing you to carry out any style decision. In our article, we will talk about the fact that installing a metal tile with your own hands is quite possible if you listen to the recommendations of experts and follow everything step by step according to the instructions that each manufacturer attaches.
- Features of metal tiles
- Some subtleties of metal tile installation
- Step #1. Material measurements
- Step #2. Arrangement of the truss system
- Step number 3. Arrangement of thermal and waterproofing
- Step number 4. crate
- Step number 5.Lower valley and cornice plank
- Step number 6. Installation of metal tiles
- Step number 7. Installing additional items
Features of metal tiles
 For those who decide to install metal tiles on their own, we recall: the angle of the roof slope should be 14 degrees or more, but not less.
Metal tiles are thin profiled sheets of metal that mimic natural tiles.
On the Russian market there is a huge selection of metal tiles from different manufacturers, both well-known brands and manufacturers without a name, Russian and foreign.
Accordingly, the price category is the most diverse: from economy to elite class. But before you decide to purchase this roofing, you need to measure the ratio: “price / quality”. Often it is directly proportional.
Although market competition drives manufacturers to use innovative developments and modern technologies, which affects the cost of goods in the direction of its reduction. Therefore, today it is quite possible to purchase high-quality roofing for a relatively low price.
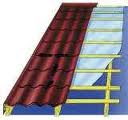
The device of a metal tile, regardless of the country and manufacturer, has an identical structure, which resembles a pie with many layers:
- Steel galvanized sheet.
- The coating is anti-corrosion.
- Padding.
- The coating is polymeric.
- Protective varnish.
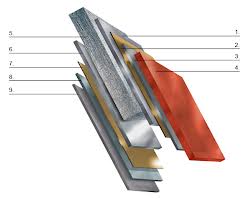
The basis of any metal tile is a steel sheet. The strength of the material and its resistance to various damages (mechanical, climatic, weather) depend on its thickness.
Thinner sheets of metal are used for interior decoration of buildings. As metal roof coverings it is necessary to use roofing sheets with a steel thickness of more than 0.6 mm.
The predetermining factor that provides the roofing material with anti-corrosion properties is zinc coating. If such a layer is absent (although this should not be), then the roofing material will not last even ten years due to low anti-corrosion qualities.
Priming not only protects the zinc coating from the negative effects of external climatic factors, but also promotes strong adhesion of the steel sheet to the paintwork.
The polymer coating guarantees overall protection of the roofing sheet. Depending on what material was used for coating, there are several types of it:
- Polyester cover. Its main advantage is low cost. Before choosing such a coating, you need to know that polyester has color instability and low resistance to many climatic, weather and mechanical stresses.
- Plastisol coating. The thickest of all coatings and therefore the most resistant to many influences.
It is important to know: such a coating is not environmentally friendly, it is harmful to the natural environment.
- Pural cover. The main advantages of this coating are high anti-corrosion qualities, color fastness, resistance to mechanical and other influences. Its main disadvantage is its high cost compared to other coatings.
- Matte polyester. This coating is as close as possible to natural metal tiles in appearance and has a higher color fastness than ordinary polyester.
All of the above types of coatings provide the material with long-term operation - up to 50 years or more. The lightness of the material (1 sq.meter weighs from 4.5 to 6 kg) provides its convenient transportation, lifting to the roof and installation on the roof structure.
It is important to know: by purchasing a set of component materials (which is available on the market in sufficient quantities), you thereby simplify the installation of the roof with your own hands.
Some subtleties of metal tile installation
Before deciding to install a metal tile on your own, you need to take care of a detailed guide. Such instructions must be requested from the seller of the material.
In it you will find a step-by-step guide to action. If you begin to do everything in turn, without retreating to a quota, then equip a high-quality roof covering.
Another option is to click on the metal tile installation on the Internet and you will find a lot of useful information. Moreover, many construction sites even offer an online consultation, which is very convenient: you instantly get an answer to your question.
Step #1. Material measurements
In order to correctly calculate the right amount of roofing material, listen to our simple tips:
- Calculate the number of rows. You can do this like this: divide the maximum length of the slope along the horizon by the width of the sheet. Round your result up.
- Calculate the number of sheets in one row. To do this, add the length of the vertical overlaps of the sheets (15 cm) with the length of the slope. We add 5 cm to the result obtained (this is for the overhang of the cornice). It is important to know: if you lay one sheet of material in a row, then you do not need to add an overlap of sheets.
Tip for beginners: use sheets that are 4-4.5 meters in size, their length is from 0.7 m to 8 m.The main thing is to choose the length of the sheet so that during installation it does not fall into the zone where the wave drop is.
Consider an example of calculating a metal tile for a gable roof, with rectangular slopes of a simple shape, the size of which is:
- width - 6m,
- height 4 m.
When choosing a metal tile with a sheet length of 4 meters and a width of 1.8 m, we get: 6x4mx1.18m = 28.31m2. We round the result obtained upwards, that is, 30 m2.
Similarly, we calculate the required amount of material for other rectangular slopes. If the shape of the slopes has a complex structure, then it is better to entrust the calculation of materials to specialists.
As a rule, the consumption of metal tiles will be 30-40% more than the area of the roof itself.
Waterproofing and heat-insulating materials, other additional elements also need to be calculated. Usually standard additional elements have a length of 2 meters.
To calculate their number, you need to measure all sides of the slopes where such elements will be used.
The resulting amount of slopes must be divided by 1.9 and then rounded up. If we calculate the lower valley, then the total amount must be divided by 1.7.
We calculate the required number of screws. To do this, the total area of \u200b\u200bthe roof must be multiplied by 8 (so many pieces of self-tapping screws on one sheet).
We also add self-tapping screws for attaching additional elements. To do this, multiply the total length of the bar by the number 8.
When calculating the required amount of material for waterproofing, you need to know - one roll is enough for 65 square meters. meters.
Therefore, we divide the total surface area by 65 sq.m. and round up to a larger number, so you calculate how many rolls of material you need to buy.
Step #2.Arrangement of the truss system
For roofing made of metal tiles, boards or bars with a section of 50x100 mm or 50x150 mm are used as rafters. Between them you need to perform a distance of 60 to 90 cm (depending on the weight of the material).
A little advice: drill holes in the side of the rafters (their diameter is 20-25 cm) in increments of 300 mm, so you will equip inter-rafter ventilation.
It is important to know: the wood used for the truss system must have a low moisture content - no more than 22%. Before installation, treat the bars with a special antiseptic (they are available in a wide range on the market).
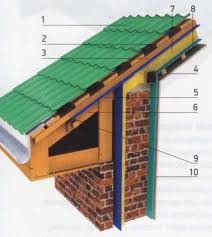
Step number 3. Arrangement of thermal and waterproofing
After you have installed the frontal and cornice boards, you can do heat and roof waterproofing. Such activities must be carried out in dry weather.
As a waterproofing material, we recommend using an anti-condensate classic film. Then between the rafters you need to lay a heater, with an overhang along the edges by 30-50 cm.
Thus, you will equip a reliable heat-ventilation channel.
We roll out the waterproofing film with an overlap and fasten it with a construction stapler.
Important: in addition, glue all joints with a special tape for greater sealing. Between the rafters we provide a 20 cm sag of waterproofing material. This measure will protect against possible material ruptures.
In places where there are difficulties (near ventilation and chimneys), the material must be applied to the walls of the pipes with an overlap of 5 cm. Also lay another layer around these elements.
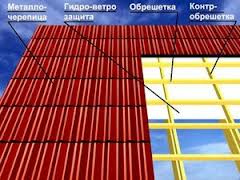
Step number 4. crate
The crate must be laid on a thick counter-rail (its thickness is at least 50 cm) and attached over the waterproofing material along the entire length of the rafters.
The lower purlin should have a larger cross section, it should be laid parallel to the eaves. Fasten the next purlin after 280 mm, all subsequent ones after 350 mm (each manufacturer describes the batten step in more detail in the installation instructions for the metal tile).
It is important to know: in order for the skate to be securely fastened, two additional purlins must be nailed under its fastening after 5 cm.
Around additional passage elements (dormer windows, ventilation and chimneys), complete the crate.
Step number 5. Lower valley and cornice plank
To the cornice and frontal boards, you need to attach the cornice strip even before installing the roofing sheets. Fastening is carried out with special self-tapping screws, following a step of 30 cm.
Important to know: very often an incorrectly installed eaves bar rattles in gusty winds. To prevent this from happening, we advise you to install it tightly with an overlap of 5-10 cm.
When arranging the lower valley, we also use self-tapping screws along the gutter in increments of 30 cm. It is necessary to install the lower edge of the valley over the eaves board with an overlap of 10 cm. For greater sealing, it is desirable to use a sealant.
Of particular difficulty is the arrangement of an “apron” on the chimney. To do this, you need to make a strobe with a depth of 15 cm in the pipe, it must have an upward slope. Try not to let this happen at the seams of the brickwork. In the place where the pipe exits, we use a special adhesive tape. Such a measure will strengthen the waterproofing.
After the sheets of metal tiles are installed, you need to make an external “apron” using a decorative strip, which also needs to be fixed with self-tapping screws and additionally sealed.
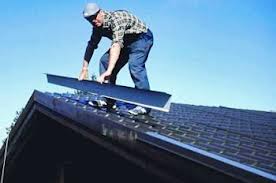
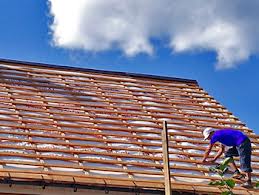
Step number 6. Installation of metal tiles
Before you install a metal tile, you need to decide which side to start its installation. Many manufacturers produce sheets, equipping them with capillary grooves to drain water.
If there is such a groove, then the installation of the metal tile must be done so that each subsequent sheet does not overlap this groove.
It is important to know: sheets of metal tiles must be aligned in relation to the eaves. This applies to pitched roofs, regardless of their design. We release the bottom sheet by 5 cm behind the eaves, equipping roof overhang.
Fastening sheets of metal:
- Produce with the help of special screws, using a special screwdriver.
- Fasten in the deflection of the wave.
- Sheets are attached to each wave from the side of the end board.
- Additional elements are mounted in the upper crest of the longitudinal wave or in each transverse wave in increments of 35 cm.
- Use a special tool to cut metal tiles.
- 1 m2 You will need 6-8 screws.
Step number 7. Installing additional items
After installing the metal tile, you can proceed with the installation of additional elements: the upper valley, the end plate and the ridge. Attach the end plank to the end board with an overlap of 10 cm with self-tapping screws in increments of 50-60 cm.
Fix the upper valley with self-tapping screws, after laying the seal between the upper element and the sheets. Fasten the ridge with special ridge screws through the wave on each side, into the upper crest of the wave.
We suggest watching a video where you can take a closer look at the installation of metal tiles with your own hands.
Did the article help you?