
Are you interested in the technology of laying metal tiles on the roof? I will talk in detail about the specifics of the installation work, be sure to list the safety rules and give examples of common mistakes. Following the suggested instructions, you can do this work yourself.
- Tools and materials
- Installation work in detail
- Stage 1: Preparatory work
- Stage 2: Installation of waterproofing
- Stage 3: Installation of the crate
- Stage 4: Installation of valley elements
- Stage 5: Mounting the adjoining elements
- Stage 6: Installation of the eaves strip
- Stage 7: Laying and fastening of metal tiles
- Safety rules for working with metal roofing
- Common Mistakes
- Conclusion
Tools and materials

You will need:
- Manual electric saw with carbide teeth;
- cutting scissors;
- Lever scissors (for ease of use, they are available in right, left and straight versions);
- Forceps with 40° bend;
- Hammer;
- mallet;
- Construction stapler and staples;
- Scissors for cutting vapor barrier film;
- Screwdriver with nozzles for the head of the self-tapping screw;
- Measuring tool and marker;
- Soft brush for sweeping away sawdust that will appear when cutting metal tiles;
- Enamel, matched to the color of the sheet, in case of scratches in the protective coating.
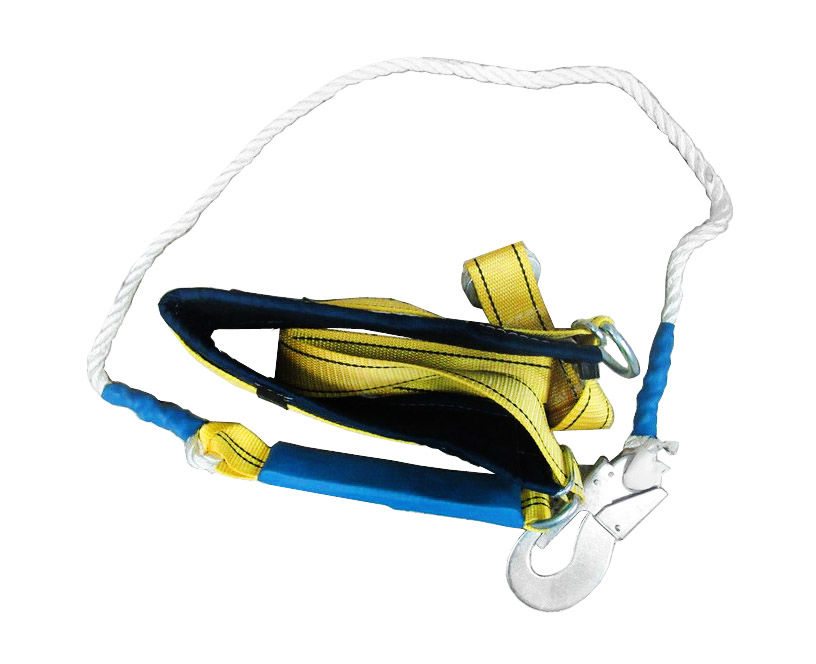
Working at height requires the use of insurance. The simplest option is a strong rope thrown over the skate: on the one hand, the rope is attached below, and on the other hand, the rope is tied around the belt. If there is a special safety belt and professional insurance, use them.
From the materials you will need:
- Metal tiles with standard dimensions (width - 1180 mm, sheet length - 3000 mm, thickness 0.50 mm);
- additional elements;
- Vapor barrier membrane;
- Vapor barrier tape for gluing joints;
- Wooden block 50 × 50 mm;
- Construction nails (length 100 mm);
- Board 50×100 mm;
- Board 32×100 mm.
Installation work in detail
")
On the diagram you can see two options for the installation of roofing systems. In a warm roof, thermal insulation is mounted directly in the gaps between the rafter legs.In a cold roof, thermal insulation is laid on the ceiling. In the instructions below, we will consider how to lay tiles on a warm roof.

Installation instructions for metal tiles consist of the following steps:
- Preparatory work;
- Installation of waterproofing;
- Installation of the crate;
- Installation of valley elements;
- Installation of adjoining elements;
- Installation of a cornice strip;
- Installation of metal tiles.
Let's consider the above steps in more detail.
Stage 1: Preparatory work
| Illustration | Process description |
 | Checking the squareness of the slopes. It is carried out before the start of installation work. Before proceeding with the installation work, we check the squareness of the slopes.
|
yvdamryloaolyvpr2 | Antiseptic treatment. We process the wooden elements of the truss system with antiseptic impregnations and flame retardants, since after the installation of the roofing material is completed, it will be impossible to do this. |
Stage 2: Installation of waterproofing
| Illustration | Process description |
 | Vapor barrier installation. After all the wooden elements of the truss system have dried, we roll out and fasten the vapor barrier membrane along the valleys (corners at the junction of two slopes). The photo shows how the vapor barrier membrane is spread on one of the sections of the roof slope. Horizontally roll out the vapor barrier membrane along the rafters.
|
 | Fixing the membrane with wooden blocks. On top of the laid membrane, to the rafter legs, we nail bars with a section of 50 × 50 mm with nails. |
Stage 3: Installation of the crate
| Illustration | Process description |
 | Fixing the membrane to the edge of the eaves. Along the cornice overhang, as shown in the diagram, we nail two boards 50 × 100 mm one on top of the other and bring the edge to their surface membranes. |
 | Crate stuffing. To maintain the same distance between the boards, use a homemade template, such as a board cut. On previously filled bars, we fill a crate of boards 32 × 100 mm in increments of no more than 30 cm. |
 | Completion of the installation of the crate. On the ridge we fill one additional board of the crate on each side of the slope. |
Stage 4: Installation of valley elements
| Illustration | Process description |
 | Bottom bar. On the inner break of the roof at the junction of the slopes, we install the lower bar of the valley, along which water will flow from the adjacent metal tile.
. |
 | Top bar. After the main sheets of the roofing material are laid, we lay the upper plank on top of the lower plank of the valley and fix it with roofing screws.
. |
 | Finished result. This is what a fully assembled valley looks like. |
Stage 5: Mounting the adjoining elements

The instruction for mounting the adjoining elements consists of the following steps:
| Illustration | Process description |
 | Bottom placket and tie. The lower bar is attached to the crate with a spade on the lower edge of the pipe. A sheet of metal with flanging along the longitudinal edges is inserted under the lower bar - a “tie” designed to drain water.
|
 | Side planks. The installation of the side bars is carried out with a spade on the bottom bar. |
 | Upper attachment bar. The installation of the upper bar is carried out with a spade on the side bars so that the water flows down, where the adjoining elements with flanges are located. |
 | Laying metal tiles. Around the completed junction, we lay the tiles in the direction from bottom to top. |
 | External finish of the junction. After the metal tile is laid, we install the external junction strips on the self-tapping screws. We do this in the same order as the internal strips that were installed earlier. The junction of the outer strips to the pipe is isolated with bitumen tape. |
How to properly install the junction bars so that there are no leaks?
| Illustration | Description of stages |
 | markup. We attach the bar to the pipe, in the position in which it will be installed. On the top of the attached bar, draw a line along the entire length with a marker. |
 | Slicing strobe. Along the intended line, we cut the strobe with a grinder or a special strobe cutter. With a long-bristled brush, we sweep the dust out of the strobe. |
 | Installing the bar. We insert the curved edge of the bar into the strobe, while trying not to tear off the protective coating from the metal. With the other edge, we fasten the bar to the crate with one self-tapping screw every 25 cm. |
 | Abutment sealing. We seal the junction of the bar to the pipe with silicone or bituminous sealant. We use not a simple sanitary silicone, but a special roofing sealant. After the sealant dries, the junctions are glued with bituminous tape. |
Stage 6: Installation of the eaves strip
| Illustration | Process description |
 | Installation of gutter holders. Prior to the installation of the eaves strip, gutter holders are installed on the bottom board of the crate.
|
 | Installation of the cornice strip. We set the lower edge of the cornice strip so that it captures the fasteners of the gutter holders. We fix the upper edge of the cornice plank with roofing screws on the first board of the lathing at a distance of about 30 mm from its longitudinal edge. The cornice strip is attached directly over the gutter holders. |
 | Vapor barrier installation. Along the entire edge of the cornice strip we glue the connecting tape SP-1. A vapor barrier membrane is brought to the edge, which, in turn, is attached to the connecting tape.
If the vapor barrier is removed in this way before laying the sheets, the condensate will flow directly into the gutter. |
Stage 7: Laying and fastening of metal tiles
| Illustration | Process description |
 | Roofing material preparation. We lay out the roofing material on a flat surface and mark the cut line with a marker in accordance with the required dimensions.
We cut the sheet according to the mark with hand scissors or power tools. |
 | Tile cut color. Metal tile laying and installation of which is carried out in domestic climatic conditions, should be protected from corrosion as much as possible. Therefore, the metal section is additionally painted. |
The installation instructions for metal tiles on a roof slope are as follows:
| Illustration | Process description |
 | Fitting and fixing the first sheet. The first sheet of material, cut to the desired dimensions, rises to the crate and aligns with the edge of the slope and the line of the ridge. If the length of the slope corresponds to the length of the whole sheet, the roofing material is laid as shown in the photo. The sheet is attached to the crate with roofing screws with an EPDM gasket.
|
 | Fastening the rest of the sheets. We lay the second sheet so that its edge enters under the already laid sheet. Previous - already laid sheet is placed above the next sheet. The remaining sheets are stacked in the same way. |
We examined the technology of mounting a solid sheet, which reaches from the ridge to the eaves.

But there are situations when not a single sheet is used, but its individual pieces. In this case, one row is attached first, and the next row is laid out on top of it with an overlap of 15 cm.
Safety rules for working with metal roofing
| Illustration | Description of the rules |
 |
|
 |
|
 |
|
 |
|
 |
|
 |
|
 |
|
Common Mistakes
- Fastening snow retainers with self-tapping screws for metal tiles.
This is a very common mistake that leads to the failure of snow retainers under the load of snow mass. The set of most snow retainers includes up to 10 special M8 × 50 self-tapping screws per section.
Do not use self-tapping screws with a smaller diameter, which are used for mounting tiles.

If roofing materials are installed by invited installers, do not be too lazy to check their work, since snow retainers are fixed with roofing screws, because you are too lazy to change the nozzle on a screwdriver.
- Gaps at the junction of the roofing material to the chimney.

Another common mistake that subsequently leads to moisture getting inside the roofing cake is the gaps at the junction of the chimney and tiles.
Remember that when performing a pipe bypass, the wall profile and sealant must be at the same level as the outer splash. In addition, the outer apron should adjoin the surface as closely as possible. chimney.

If the installation is not done correctly, as in this photo, the use of bituminous tape is just a temporary solution. Such sealants, due to the temperature difference, will sooner or later leave, and a gap will appear.
- Gaps at the junction of the roofing material to the valley.
The situation is similar to the gaps at the junction, when large gaps are not explained by anything other than the carelessness of the installers. Remember that any open gap is the path through which rainfall is guaranteed to get inside the roofing pie and this will significantly reduce the resource of the entire structure.
If invited specialists are engaged in laying the roofing material, be sure to check the quality of the work, since the considered defect is not uncommon.
- Corrosion of metal along the cut line.
One of the most common mistakes is cutting metal tiles with a grinder with a cutting disc for metal. The mistake is typical for novice installers who do not understand why buy a special cutting tool if there is a grinder.

Cutting metal with a disk rotating at high speed leads to overheating of the paintwork or polymer coating, which protects the tin sheet from corrosion. As a result, the sheet along the cut line will rust, and the coating will gradually peel off.
- Curvature of the sheet due to improper storage.
If the roofing material is purchased ahead of time and stored incorrectly in stacks, the sheet may be warped. As a result, there will be difficulties with laying metal tiles, and you will have to spend time leveling the material or spend money on buying new sheets.
To prevent the sheets of material from deforming, the height of the stack in which they are folded should not exceed 70 cm. In addition, if storage lasts more than a month, the stack must be disassembled and the sheets should be put in the reverse order.
- Overtightened or undertightened screws.
This error is typical for novice installers who do not have sufficient experience.

If you do not tighten the screw, water will enter the hole and the process of corrosion will begin. If the screw is overtightened, the protective coating will also be damaged and corrosion cannot be avoided in this area.
Conclusion
Now you know how a metal roof is mounted. Still have questions and need detailed explanations? Ask about what is interesting or unclear in the comments - I guarantee answers and comments. By the way, do not forget to watch the video in this article, I'm sure it will be interesting to you.
Did the article help you?