Are you building a roof, but do not know how to mount the nodes of the passage through the roof? I had to face this problem and now, having gained experience, I will tell you about all the intricacies of choosing and self-installing such transitions.

Types and general characteristics of structures
Ventilation passage nodes through the roof is a common name, professionals refer to these structures simply: roof penetration.
By the same principle are mounted:
- chimneys made of metal insulated sandwich pipes;
- television antenna rods;
- fan (sewer) ventilation;
- roof vents.
It should be clarified that the node of the passage through the roof of the chimney made of bricks is equipped according to a different principle. This is due to the fact that a brick pipe, unlike a metal insulated sandwich pipe, can heat up quite strongly.

Types of roof penetrations
| Illustrations | Explanations |
 | Roof penetration without valve. This is the simplest penetration, it is usually chosen by the owners of small private houses, where there is no need to adjust the ventilation flow. Plus, the price of such a node will pleasantly please you. |
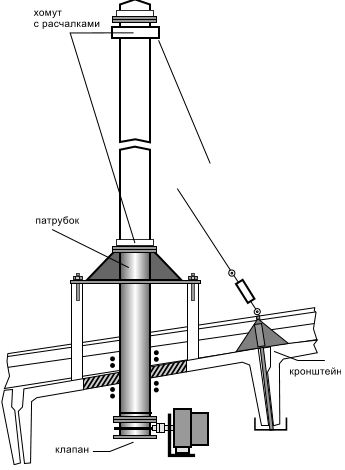
 | Roof penetration with valve.
Such a ventilation passage assembly, as a rule, is mounted on powerful ventilation systems of multi-storey buildings and office buildings. The photo on the left shows a steel adapter with a valve, which is attached to the concrete roof with anchor bolts. |
 | Roof penetration with and without insulation.
In the vast majority of cases, such passages are now insulated. As shown in the diagram on the left, dense basalt wool is used for insulation, but on cold pipes, for example, foam can be used for fan ventilation. An uninsulated ventilation passage through the roof is mounted only in cold attics and when arranging under-roof ventilation. |
 | Adjustable penetrations.
There are 2 types of designs: with automatic and manual control. The gate valve on automatic penetrations is equipped with an electric motor and is controlled by an automatic ventilation system. |
 | Manual control.
In mechanical systems with manual control, the gate is adjusted using a transmission mechanism, sometimes this mechanism is equipped with a cable. |
When choosing ventilation passage nodes, it is necessary to take into account the type of roofing material. Of course, there are universal adapters, but their price is higher, so it is better to look for specialized units, especially since reputable roofing manufacturers necessarily produce related fittings.

Product marking
The nodes of the passage of ventilation through the roof have their own special marking. This guide will help you figure it out:
- Any such marking has the form "UP * - **". The letters UE mean "gate node";
- These letters can be followed by the number 1, 2 or 3:
- The unit means the simplest unit, it is not equipped with a valve and there is no condensate collection ring in it;
- A two indicates a manual valve. The next two numbers after the hyphen characterize not only the diameter of the ventilation pipe, they can be used to understand whether this product has a condensate collection ring. If the hyphen is followed by numbers from 1 to 10, then there is no ring. Accordingly, the numbers from 11 to 21 indicate the presence of a ring for collecting condensate;
- Troika is a fully equipped unit. They have an automatic adjustment valve and a condensate collection ring. True, when buying, you need to specify the parameters - the fact is that not all manufacturers build an electric motor into the base model, you will have to pay for it separately;
- As I already mentioned, the two digits after the hyphen in absolutely all models indicate the cross section of the ventilation pipe. Moreover, this is not the section itself, but only its marking, specific data are indicated in the table below.

The principle of installation of roof passages
Let's find out how do-it-yourself ventilation passage nodes through the roof are installed. First, we will talk about the installation of passages for different systems of the house, and then I will dwell on the main points of installing under-roof ventilation.
Installing a transition for ventilation systems
| Illustrations | Recommendations |
 | Decide on the place of installation. We proceed from the fact that the ventilation pipe has already been brought to the attic and we need to “pass” through a fully equipped and insulated roof made of metal or profiled sheet (there is no big difference here):
|
 | Using a self-tapping screw. From below we got to the material of the roof, but the main part of the passage structure is installed from above and in order to find the entry point on the roof, we need to drive a self-tapping screw from the bottom of the roof. |
 | Marking the window for the frame. In the kit of almost all such units there is a paper template that repeats the inner contour of the roof lining. We take this template and use it to mark the place of the future tie-in. |
 | Cut out the window.
The thickness of a metal tile or profiled sheet often does not exceed 1.2 mm. It is quite possible to cut such metal with a good knife. Simply put, open like a tin can. |
 | Fasten the bottom ring.
|
 | Fixation. Now we need to fix this ring with self-tapping screws on the underlaying crate on both sides. |
 | tongue in the center of the sealing ring is cut off, we do not need it;
|
 | Attaching the top deck. First we put on metal hooks, the center is determined by them. Such brackets are used only in some models of units intended for metal tiles; they are practically not used in profiled sheet roofs. |
 | Overlay. Next, install the top lining, crimp it to the shape of the roof and mark it out;
The body of the superstructure is usually made of metal, iron 1.19 mm thick or stainless steel 0.5–0.8 mm thick is used. There is a rubber gasket on the bottom. |
 | We remove the overlay and apply silicone around the perimeter;
|
 | We finally fix the superstructure in its place and fasten it with self-tapping screws with a press washer. Self-tapping screws must be driven diagonally, so the lining will be attracted to the base evenly and will not warp it. |
 | Fastening the connecting element.
That part of the pipe, which is located on the roof, has a lower branch pipe, through which it is connected to internal structures. It is very difficult to get this pipe clearly into the neck of the ventilation pipe installed in the attic, so we use a connecting rubber corrugation. The corrugation is fixed on adjacent pipes with metal tightening clamps, which are clearly visible in the photo on the left. |
 | We expose the pipe.
All pipes on the roof must be strictly vertical. To do this, we install our pipe in the adapter and set it to the level. |
 | We fix the pipe.
Further, the pipe is fixed with an adapter with self-tapping screws. In this model, 3 self-tapping screws are driven from each side. Just as when fixing the lining, the screws must be driven diagonally. |
 | We assemble the system.
Now we just have to put the corrugation on the lower plastic ventilation pipe and fix the connection with a clamp. |
Installation of vents for under-roof ventilation
| Illustrations | Recommendations |
 | Why is it needed. All insulated roofs must be equipped with under-roof ventilation, otherwise condensate will constantly settle from the inside. In winter, this condensate will freeze, as shown in the photo, and in summer, moisture will be absorbed into the wooden rafters and crate, gradually destroying them. In addition, if you insulate the roof with mineral wool, then without under-roof ventilation it will quickly become damp and become useless. |
 | How it works.
During installation, a ventilation gap must be left between the roofing material and the vapor barrier. From below, in the region of rain tides, fresh air enters this gap. The air will inevitably heat up from the roof and rise up. On relatively small roofs, ventilation passages are made on both sides of the ridge to allow air to escape. If the roof plane has an area of more than 60 m², then additional ventilation passages are installed on the plane itself. |
 | Bottom ventilation gap.
During the arrangement of the roof, the ventilation gap from below is sewn up with a PVC insect net. After that, metal ebbs are installed on top, in which a ventilation gap is also left. |
 | Additional fixation. In order to provide a fixed ventilation gap between the metal casting and the base, we inserted a piece of a polypropylene tube (20-30 mm) and drove a self-tapping screw with a press washer through it. |
 | Ridge ventilation.
To ensure the release of air in the area of \u200b\u200bthe ridge, there are many models of ridge products. The general principle of operation and one of the models of such products is shown in the diagram on the left. |
 | Point aerators.
On roofs with a large quadrature and a steep angle of inclination, one ridge air is not enough. In these cases, additional roof penetrations are mounted, these units are also called point aerators. Such penetrations are installed at a distance of no more than a meter from the ridge. I told you about the technique of installing penetrations on metal tiles, the video in this article shows how penetrations are mounted on bituminous tiles, the technology here differs only in small things. |
Conclusion
Now you know how different models of ventilation passage units through the roof are mounted. The video in this article has additional information on the topic, and if you have any questions, ask them in the comments, I will try to help.

Did the article help you?