The correct installation of the roof involves the installation of a truss system and a roofing pie. To install the rafters, experience is needed, but it is quite possible to mount the roofing pie yourself, and then you will learn about all the intricacies of the arrangement using the example of metal tiles and soft bituminous roofing.

What does the roofing market offer?
| Illustrations | Recommendations |
 | Soft roof. There are several types of soft roofing:
Roll coatings and membrane roofing are usually used on the roofs of high-rise buildings and industrial buildings, but shingles are great for private homes. The price of such materials now starts from 250 rubles. for 1 m². |
 | Types of tiles.
In general terms, the arrangement of tile roofs is the same everywhere, the segments are mounted overlapping on the underlay, but the tile is suitable only for a sloping roof.
|
 |
|
 |
|
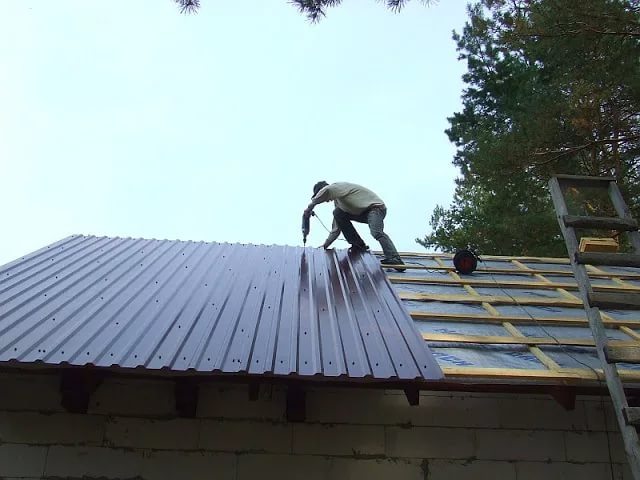 | Decking or profiled sheet. These two materials differ from metal tiles only in the type of profile and cost (metal tiles are more expensive), otherwise it is the same galvanized sheet with polymer coating (price from 250 rubles / m²).
|
 | seam roof. This is also a metal sheet, only smooth.The installation of a roof with a seam connection is more complicated than the two previous options, but the coating will be monolithic, without overlaps (price from 500 rubles / m²). |
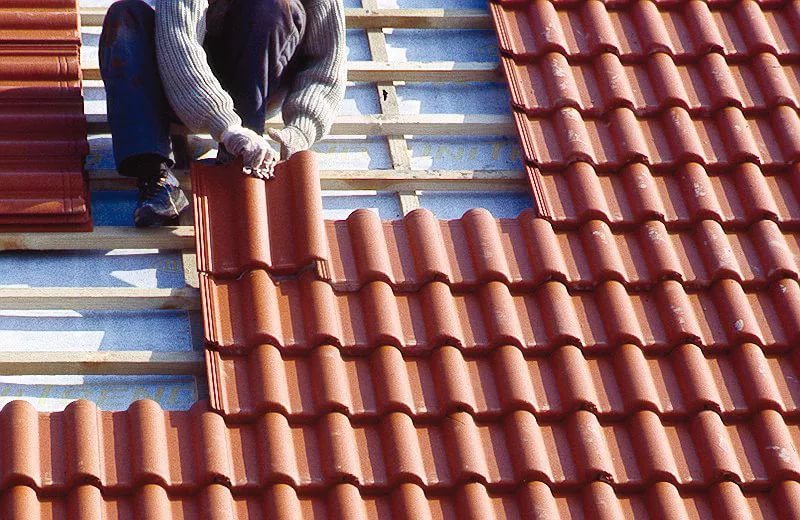
 | Slate.
Classic slate is made from asbestos cement, but such a coating lasts no more than 15 years. But now polymer sheets with the same configuration have appeared. They can withstand without repair for up to 30 years, plus the color range there is quite wide (price from 250 rubles / m²). |
Roof technology
In general, the device of roofs is divided into 2 types: with insulation and without insulation, I will show how more complex options with insulation are equipped.

Option number 1. How the metal tile is mounted
Do-it-yourself installation of a metal tile roof is not much different from the installation of a profiled sheet and slate, I chose this particular material, because now it is perhaps the most popular and affordable.
| Illustrations | Recommendations |
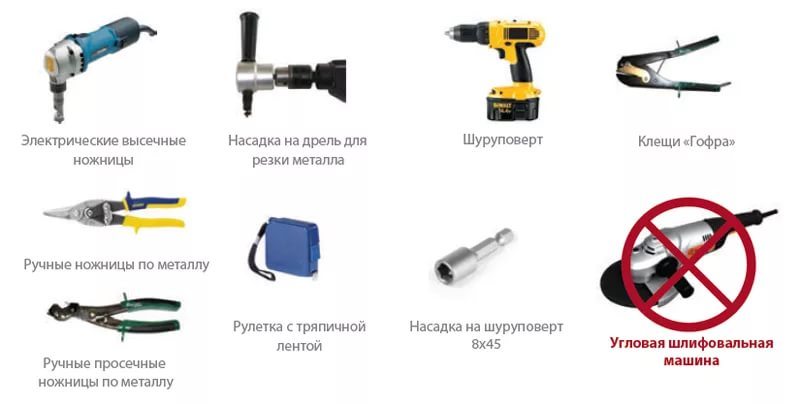 | Tools. The photo on the left shows the minimum set of tools, in addition to it you will need:
|
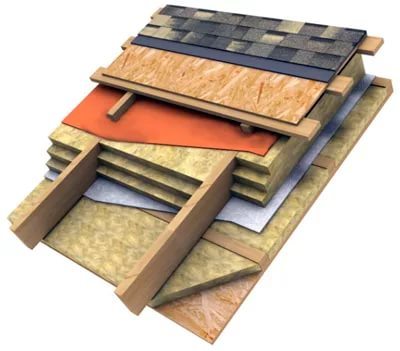
 | roofing cake. The scheme of the roofing pie is simple, but it is important to follow the order of installation. |
 | Waterproofing.
First, waterproofing is laid on top of the rafter legs:
|
 | Horizontal canvases they are nailed to the rafters with 50x50 mm bars, and the overlap is glued with double-sided adhesive tape.
|
 | We fill the crate.
|
 |
|
 |
|
 | Arrangement of the valley. The valley is the corner joint of two roof planes. It consists of a bottom and top bar. The main amount of water will drain along the bottom bar, and the top bar is more for decoration. |
 | bottom rails are screwed to the crate from the bottom up with self-tapping screws with a press washer. The overlap should be 100–150 mm.
The top bar is screwed after fixing the sheets of metal. |
 | We go around the brick pipe.
Around the pipe, we need to mount straight sheets with flanging:
|
 |
|
 | After installing the metal tile, it will be necessary to fix the top plate with self-tapping screws, similar to the valley. |
 | Gutter system. It is desirable to mount this system before covering with metal tiles:
|
 |
|
 |
|
 |
|
 | eaves plank.
|
 |
|
 | Cutting metal tiles. Sheets of metal tiles can be cut with scissors or special nozzles. After cutting, the edge of the cut is treated with polymer paint.
|
 | Roof installation. The metal tile is a delicate thing and you need to lift it carefully along the pre-knocked guides. |
 | Fit. If the length of the sheet is equal to the length of the roof slope, then the sheet is immediately aligned along the ridge and fastened with self-tapping screws.
|
 |
|
 | If your sheets are less than the length of the slope, then the roof is sewn up in sectors, as shown in the diagram. |
 | Mounting the skate. Ridge pads are flat and semicircular, but there is not much difference in installation.
|
 |
|
 |
|
 | We mount thermal insulation. As thermal insulation, I recommend using dense basalt wool slabs. The slab is cut 2–3 cm larger than the opening and inserted between the rafter legs. |
 | There is no need to fix the plates at this stage. If you gave a good overlap, then they will stay in their places anyway. |
 | We mount the vapor barrier.
Thermal insulation boards are hemmed from below with a vapor barrier sheet. It will not allow the basalt wool slabs to be saturated with moisture, plus it will keep them in the opening. As you can see in the photo, the canvas is attached with a stapler. Move from bottom to top.The joints of adjacent canvases are overlapped and glued with double-sided tape. The installation of the insulated roof is over, now it only needs to be sheathed from the inside with some kind of finishing material, for example, clapboard. |
Option number 2. Installation of soft tiles
| Illustrations | Recommendations |
 | Tool. To equip a soft roof, you will need:
|
 | slope. The minimum possible roof slope for such a coating is 11.3º. |
 | materials.
|
 | roofing cake. The roofing cake here is exactly the same as in the version with metal tiles, only a continuous layer of OSB sheets or waterproof plywood (thickness from 12 mm) is sewn onto the upper crate.
|
 | Lining carpet. The lining carpet is laid first on a solid base. There is an adhesive layer along the edges of the canvas, this layer is protected by a film, which is removed during installation. We begin the installation by rolling the strip along the valley; Next, roll out the strips on the roof. Strips can be rolled out both horizontally and vertically. I prefer vertical styling. |
 |
|
 | Cornice planks.
The lining carpet is folded over and a cornice strip is stuffed on top. The planks are joined with an overlap of 100-150 mm. |
 | Valley carpet.
Further along the valleys, we roll out and nail the valley carpet. This is the same tile, only in a roll. |
 | Cornice tiles.
Now we remove the protective film and glue the cornice tiles to the cornice strip at a distance of 10 mm from the edge. |
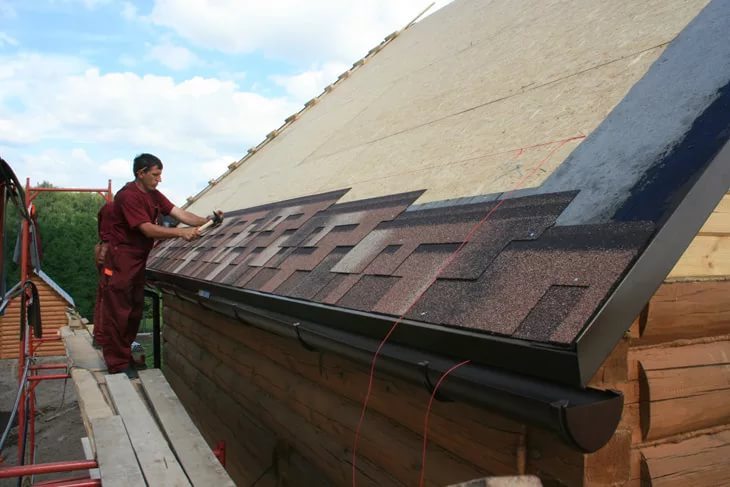
 | Ordinary tile.
We take the ganty of an ordinary tile and nail them in such a way that the nails pass through the eaves tile. |
 | The next gangs are set so that the protrusions of the top row overlap the cutouts of the previous, bottom row.
So we get to the skate. The extreme row is cut off along the ridge. |
 | To the carpet of the valley, the gantas of the front tiles are glued with an overlap of 100 mm.
On the side edge, they are glued to the cornice strip. |
 | Skate.
There is no special ridge tile, here we take a cornice tile and cut it across into 3 parts. Then we remove the film and glue these pieces with an overlap and nail them, 2 nails on each side. |
 | Finished result. |
Conclusion
As you can see, the installation of the roof in the two presented options is simple and you can mount such a roof in a few days. The video in this article also has interesting installation tips. If you have any questions, write in the comments.
Soft tile roofing is deservedly considered one of the quietest.
Did the article help you?