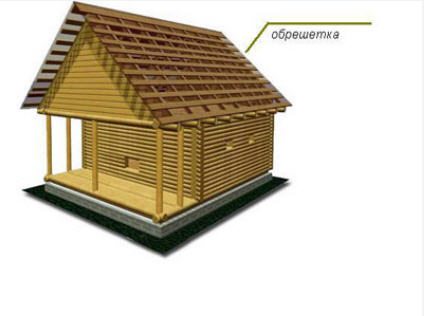
Most materials are attached to the building envelope not directly, but through an "intermediary". This is both more convenient and, if necessary, simplifies repairs. In some cases, this method of installation is a mandatory technological condition. A specialized frame designed for such installations is called a crate. Further in the article, we will talk about how the crate is being installed, what it happens to be, and according to what rules it is calculated.
Although the most common design in which the crate is used is pitched roofs, there are other planes where it is suitable. The most popular option is a wooden crate, but there are also metal structures.
 For example, when installing drywall, the same frame made of aluminum profiles is quite suitable for the definition of a crate.
If we summarize all the cases when the crate is arranged, we can deduce three large groups:
- Roofing device
- Installation of interior walls and partitions
- Creation of ventilated, hinged and other decorative facades
As a rule, in the last two cases, the crate really looks like a checkered structure. On the roof, the options can be very different.
The scheme of the carrier system is determined by the coating material used, and is calculated separately in each case.
According to this principle, the following types can be distinguished:
- The usual step of the crate - as a rule, is in the range of 20-40 cm between the bars or boards
- Sparse - when the distance between the elements is 50-75 cm, sometimes more
- Solid crate - made of boards with a distance between them of up to 10 mm (the gap is made to avoid damage to the roof in case of swelling or drying of the boards). Dry tes is laid close, sometimes a grooved connection is arranged. Also, sometimes they arrange a structure made of solid sheet materials: OSB, moisture-proof chipboard or plywood
ADVICE! When arranging a crate from boards, each of them is attached to each rafter with two nails along the edges. It is impossible to nail the boards with one nail in the center, since if the roofing is twisted out, it can be damaged.
As a rule, the step of the lathing depends on the size of the roofing material and its rigidity: the greater the length of its unit, the less often the timber or boards are placed.
For example, for slate, the pitch can be up to 75 cm. For small-piece materials, such as tiles or shingles, as well as bitumen-based roll coatings, a continuous crate is installed.
She is also satisfied with the construction of roofs that are curved or have a complex shape.
The thickness of the crate can be different. Sometimes they arrange a crate in two layers. In this case, the lower layer can be sparse, and the upper layer can be continuous. The first level is arranged parallel to the roof ridge, and the second can be located perpendicular to it, or diagonally.
It also provides for the manufacture of a crate in two layers when laying a thick insulation - for example, foam plastic 100 mm thick. In this case, two 50x50 mm bars are stuffed sequentially across the rafters, one on top of the other.
Usually the crate is arranged from a bar 50x50, 50x60, 60x60 or 75x75 mm, as well as from a board from 20 to 50 mm. In this case, the width of the board should not exceed 150 mm, since a wider material is prone to increased deformation under the influence of dampness and temperature.
The calculation of the crate is carried out together with the truss system, since both the pitch of the beam and its cross section will depend on the pitch of the rafters.
Important information! The length of fasteners (nails or self-tapping screws) is taken as double the thickness of the lathing material). For example, for a bar 50x50 - this is 100 mm. Sheathing is fastened to each roof rafter.
Boards and timber should not have protruding knots and other defects, and for fragile coating materials, such as slate, and significant depressions.
Under roof device from rolled materials, the joints of an unedged board are sheathed with galvanized iron, and in places of bends and junctions, the corners of the board or beam are rounded so as not to damage the elastic coating.
Also, the extreme 30 cm of the crate in place are sheathed with solid pieces of metal. roof overhang.
The order of work is usually the following:
- On the extreme rafters mark the location of the bars or boards of the crate
- Along the entire slope, with the help of a cable, the places where the bars or boards are fastened are measured.
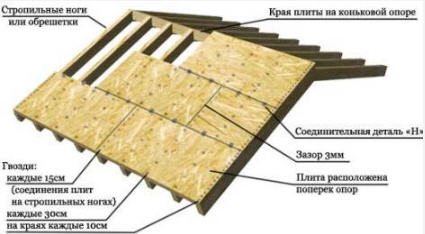
An example of a continuous crate
- If there are bulges on the rafters at the points where the beam passes, they are cut off
- In the case when a vapor barrier device is planned, it is laid on the rafters, fixed with a stapler. At the same time, the laying starts from the ridge, with the overlapping of the panels through it. If the membrane is transparent, the measuring cords can be removed completely. Otherwise, the film is slipped under the twine when laying
- If there are recesses on the rafters under the future timber, they are leveled with stuffed rails, a set of pieces of roofing material of the desired thickness
- Beams or boards begin to be fixed from the ridge beam, depending on the coating material and the chosen method of arranging the ridge assembly - at a distance from the run from 40 to 150 mm for each slope
- As a rule, the crate is installed in pieces, while simultaneously closing the area of \u200b\u200bthe slope, determined by the length of the existing beam or board. Then move on to the next run.
Important information! It rarely happens that a wooden crate is made from a solid board or timber. As a rule, the standard length of lumber is much less than the length of the slope. Therefore, the elements of the crate have to be spliced along the length. This is done in such a way that the joint of the beam falls on the rafters, the edges of both spliced pieces are fastened with nails. It is important to ensure that in adjacent horizontal rows the joints are displaced, falling on different bars. To do this, the lumber is cut to the appropriate length.
- No matter what the main distance between roof lathing, in places of valleys and grooves (concave joints of slopes), it is arranged solid, possibly using sheet material, sometimes tin
- Under the elements passing through the roof - various parapets or chimneys, their own crate is arranged, which is calculated separately. For example, for a chimney - it should be in any part of it at a distance of at least 150, and without thermal insulation for ceramic pipes - and 250 mm
ADVICE! The lathing should be arranged in dry weather, immediately before laying the roofing material. Wet bars or boards will definitely begin to warp
- Immediately after the installation of the crate, a layer of insulation is laid, if one is designed, and a waterproofing film is attached over the beams with a stapler
With the advance calculation and cutting of lumber, the installation of the crate is greatly accelerated and takes less effort. Therefore, additional time should be devoted to preliminary preparation, and it should be done qualitatively.
Did the article help you?