Can an ordinary home master build the roof of a house with his own hands? At first glance, the task seems rather complicated, but after practicing at my own dacha, I realized that everything is real. I will show you step by step and tell you how to make a roof with your own hands, what components it consists of and what roofs are in general in private houses.

Briefly about the types of roofs and general terminology
Before making a roof, you need to figure out what structures exist and what their main elements are called. Otherwise, you will not understand anything in the specialized literature, plus it will be difficult for you to talk with sellers in a store or market.
Which design is better to stay
| Roof types | Short description |
 | Shed. The easiest, most affordable and economical option in terms of materials. The problem is that it is not suitable for medium and large houses. Most often, a shed roof is mounted on garages, sheds and other outbuildings. |
 | gable or tongs.
A traditional and rather comfortable design that fits any home with a rectangular or square "box". Now more than half of the owners of private houses and cottages choose a gable roof. |
 | Shatrovaya.
The hipped roof looks like a tetrahedral pyramid, consisting of isosceles triangles with a common vertex. Now it is rare, the main reason lies in the complexity of the beam-pulling system on which this design is based. |
 | Chetyrekhskatnaya or hip.
This design is also based on the beam-tightening system, but is more common than the hipped one. Fans of these types of roofs should not be taken. |
 | Half hip.
In the classic version, the half-hip roof is no longer used. The structure is assembled according to a gable truss scheme using puffs and “fillies” bent upwards. |
 | Mnogoskatnaya.
Of all the existing multi-pitched roof is considered one of the most complex structures. It is installed only on buildings with an "original" layout or houses with several extensions. Only highly qualified professionals can work with such roofs. |
 | Attic.
This type of roof is only slightly inferior in popularity to the gable construction. People are attracted to living attic space. You can build a mansard roof with your own hands, but you need some experience, so it's better to start with a gable roof. |
After analyzing the popular types of structures, I realized that for an amateur, the best solution would be to install a gable roof.
General terminology

- Ribs - all external corners and bends, except for the upper edge, are called ribs;
- Valva - front plane in a multi-pitched roof;
- endova - the internal angle between adjacent planes on roofs with several slopes;
- Skate - the upper edge of the roof, on which the slopes converge. There is no ridge on the tent and single-slope structure;
- dormer window - a small triangular or spherical cut into the roof slope with a window frame inside. It is mounted more for decoration, there is little functional load on the dormer window. Fans of such designs are better off not messing with;
- Eaves overhang - this is a cut of the lower part of the roof, more precisely, everything that is outside the wall. Just to the edge of the cornice overhang rain gutters are attached;
- Gable - a vertical sector on the facade of the building located between the slopes of the roof;
- Gable overhang - lateral oblique cut of the roof plane.
Now let's figure out what the internal structures of the roof are called.

- Mauerlat - a support beam that is mounted on the walls around the perimeter of the box of the house, it can also be called the foundation of the roof. cross section Mauerlat depends on the weight of the roof and the dimensions of the house, most often it ranges from 100x100 mm to 200x200 mm;
- rafter legs - perhaps the main structural element, the entire roof rests on them. In a gable roof, they are joined at an angle and form a stable isosceles triangle. For medium houses, beams of 50x150 mm are taken, and in large houses 100x150 mm or 100x200 mm;
- Rack - a vertical beam supporting the rafter legs. Can be based on ceiling beams or beds;
- lying down - this is a kind of Mauerlat, only the beds are installed not around the perimeter of the box, but on the walls of a large house. These elements are used only in the "layered" system, which I will mention later;
- puff or crossbar - a horizontal beam that connects two adjacent rafter legs of a gable roof and forms an isosceles triangle with them, thereby increasing the strength of the entire structure;
- Run - mounted in the case when puffs are not installed on all rafter pairs. Runs are needed for additional support for rafter legs and forest savings;
- ridge beam - (it is not indicated on this diagram) is mounted horizontally and installed at the top of the gable roof directly under the connection of the rafter legs or between the rafter legs.
Preparation and installation of a gable structure
At the preparation stage, you make a calculation of the truss system, draw a sketch or drawing, and then purchase the material and prepare the tool.
Roof calculation
The first thing you need to know is the angle of the roof plane. All pitched systems are divided into 3 types:
- Flat roofs - in them the angle of inclination does not exceed 5º. Almost never found in residential buildings;
- Roofs with an average slope - here the slope should be from 5º to 30º. Well suited for steppe regions where there are strong winds and little snow;
- Roofs with a steep slope - these include all slopes with a slope of more than 30º. These roofs are placed in areas with snowy winters, because the steeper the slope, the faster the snow will come off it.

As for the calculations themselves, here it is necessary to divide the height of the roof from the attic floor to the ridge, by half the length of the span along the horizon. If you want to get the value as a percentage, then multiply the result by 100%.

| Illustration | The difference between a layered system and a suspended one |
 | suspension system. The rafters in this system are installed only on the Mauerlat between the bearing walls. If the rafters are supported by racks, then the racks are attached to the ceiling beams. |
 | Layered system.
This system differs from the suspended one in that the racks supporting the rafters are based both on the load-bearing walls and on the walls inside the house. |
Tools and materials
From the tool you will need:
- Axe;
- Hand saw wood and metal;
- Chainsaw or an electric saw;
- Hammer;
- Plane;
- Drill;
- screwdriver;
- Open end wrench set.
- Roulette, level, plumb.
It is advisable to knock down at least 1 stand from the boards for working at height, popularly referred to as the "goat".

Materials:
- Beam under rafter legs - the most common section is 50x150 mm;
- Beam under Mauerlat - you can take a solid beam or assemble it from the material under the rafter legs. In both cases, the price is about the same;
- Beam under puffs, runs and racks - I took a bar 50x50 mm, but you can use a rafter beam 50x150 mm;
- Bars for counter battens - standard section 30x40 mm;
- Board for roofing lathing - is selected for roofing material, the most common option is unedged board;
- metal studs with thread and nuts to them - section 12–14 mm;
- Mounting brackets and plates - sold ready-made with holes for self-tapping screws;
- self-tapping screws — in assortment starting from length 50 mm and more;
- Nails — in assortment starting from length 50 mm and more;
- Metal staples - made of reinforcement or rolled products with a thickness of 10 mm or more.

Mauerlat installation
| Illustrations | Operating procedure |
 | Arrangement of a block base. If the house is block (brick, cinder block), then under the Mauerlat you need to pour a concrete reinforced belt over the wall. The height of the belt is 250–300 mm, the width of the belt is equal to the thickness of the wall. You make a wooden formwork, lay a reinforcing cage inside and fill everything with concrete. |
 | Stud bookmark.
Even before pouring concrete, it is necessary to vertically install a number of threaded studs or simply pieces of reinforcement in the center of the future strapping with a step of 0.6–1 m. Mauerlat will then be attached to them. In houses made of aerated concrete, a concrete reinforced belt is poured directly into the U-shaped shaped gas blocks. |
 | Mauerlat in a wooden house.
There is no Mauerlat as such in wooden houses; its function is performed by a beam or a log of the upper trim. |
 | Aligning the base.
Under the Mauerlat, the base should be perfectly flat, if at first you missed this moment, then you will need to level it before laying. The base can be leveled with a cement-sand mortar or glue for gas blocks (glue is used in houses made of aerated concrete). |
 | We equip waterproofing.
The beam should not be in direct contact with concrete, therefore, before laying the Mauerlat, we cover the roofing material on top, preferably in 2 layers. |
 | Beam installation.
We drill holes in the Mauerlat for the studs embedded in the wall, put the beam on the studs and pull it to the wall. Be sure to place a wide washer on top and lock the mount. A solid beam is joined into half a tree, that is, make a cutout as in the photo, join two sectors and drive 5–7 long screws or nails on top. If the Mauerlat is recruited from rafter bars, then they are simply stacked apart and fastened with self-tapping screws. |
 | Mauerlat.
There are cases when the Mauerlat is assembled from pieces laid between the floor beams, but the strength of this design is much lower, plus you will need 2 times more anchors for fastening. |
 | Wood processing.
Absolutely all the wood that goes to the construction of the roof must be treated at least 2 times with antiseptics and flame retardants, otherwise the roof will stand for no more than 10-15 years, then it will be eaten by bugs. |
 | Wood moisture.
It is impossible to make a roof from a freshly sawn forest, in the process of drying under load, beams and boards can lead or they will begin to crack. To reduce costs, you can take freshly cut wood in advance and stack it under a canopy, the wood will dry out during the season, the laying order is shown in the diagram on the left. |
Installation of the truss structure
| Illustrations | Operating procedure |
 | Installing the end rafters.
The first are 2 triangles at the edges. To keep them from wobbling, I reinforced both triangles with a temporary stand and a diagonal brace. In addition, I also fixed the temporary vertical rack with two boards diagonally. |
 | Starting mounts for rafters.
On the Mauerlat, I installed and secured bars of 50x150 mm with metal corners. The bars are cut at an angle of inclination of the roof.
|
 | Fixing rafters from below. As the rafter legs are installed, the base of the beam is clamped with the same stop and fastened with self-tapping screws. Later, in addition to self-tapping screws, I plan to tighten this entire structure with a 12 mm through stud. |
 | Additional fixation.
In principle, such fasteners are enough, but to be sure, I decided to support the rafter leg with triangles from below. |
 | On the extreme rafter triangles, I put 2 metal corners from the inside.
A metal plate is screwed on the outside, and then the pediment will be sheathed on top with a 25 mm board and siding. |
 | Gain. In addition, 1 m from the Mauerlat to the extreme rafters, I fixed additional support racks. |
 | ridge beam.
From above, I launched a ridge beam, for this I fixed 2 puffs (crossbars) with a gap of 150 mm on the rafters, inserted a beam between them and fixed it with metal corners on self-tapping screws. |
 | Building. The ridge beam came out longer than the rafter leg, so it had to be increased.
I attached 2 linings from the same beam on the sides and pulled it all off on both sides with 12 mm studs. |
 | Fixing rafters from above.
My rafters turned out to be 6 m each, and the entire span was 7 m wide. At the top point, the load is solid, especially in the extreme triangles, so I cut out the lining from a 5 mm thick steel sheet, drilled them and pulled them together with five studs. |
 | Fastening puffs (crossbars).
Intermediate crossbars on the extreme rafter triangles are inserted inward and fixed with metal plates on both sides. |
 | Hairpins. All other rafter triangles are fastened with two puffs (one puff on each side).
On the rafters, the puffs are fixed with two studs and four self-tapping screws. |
 | We pull the cord.
After the final installation of the extreme rafter triangles, a cord is pulled between them. This landmark will help us set all the other rafters in the same plane. |
 | Planting rafters.
In my case, each rafter at the connection point with the Mauerlat was cut, as shown in the photo. But this is not the only option for connecting the rafter leg to the Mauerlat. |
 | Rafter landing options.
|
 | Docking in a wooden house. In a wooden house, the rafters cannot be rigidly attached to the Mauerlat, they will warp when shrinking. For fixing, a floating mount is used here, the photo on the left shows how it works. |
 | Filly.
My cornice overhang turned out to be a continuation of the rafters. If the length of the rafters is not enough, then they rest against the Mauerlat or extended floor beams, and the cornice overhang is increased by the so-called "fillies". Usually these are bars with a section of 50x100 mm, which are attached to the rafters with self-tapping screws. Each such bar should overlap the rafters for at least half a meter and hang over the wall for the same distance. |
 | truss system.
The assembly of the truss system is over, now I will show you how to properly mount the roof sheathing. |
Roof installation rules
| Illustrations | Operating procedure |
 | We mount a drip.
The first to be mounted on the edge of the gable overhang is a “dropper” - a corner made of a thin metal sheet, which is needed to seal the cut. To do this, I cut niches in the rafters and stuff a 25x150 mm board into them on both sides, so that I get an angle. A dropper is attached to this outer corner with self-tapping screws. |
 | Barrier for thermal insulation.
A barrier is inserted and fixed between the rafters parallel to the wall, it will not allow the internal roofing thermal insulation to slide down. I made the barrier from a board 25x150 mm. The board is attached at 3 points to self-tapping screws, along the edges to the rafters and below to the Mauerlat. Self-tapping screws are driven at an angle. |
 | We glue the tape.
In order for the waterproofing membrane to fit snugly against the drip, I first glue the “K2” butyl rubber tape on the edge, and glue double-sided tape on it. |
 | waterproofing membrane.
I used a waterproof vapor permeable membrane for roofs "Strotex-V".
|
 | Membrane laying.
|
 | Control grille. As soon as one strip of the membrane is fixed, we begin to fasten the counter-lattice. I used a 30x40 mm bar and screwed it to the rafters with 80x5 mm self-tapping screws.
|
 | Seal. At the bottom of the bars of the counter-lattice, I glued strips of cross-linked polyethylene 3 mm thick, on one side this tape has an adhesive layer. With such a seal, the bar holds the membrane along the entire line of contact, moisture cannot penetrate under the bar, plus the staples from the stapler are closed. |
 | Lathing fastening.
The step of the outer crate depends on what type of roof you have, in my case a metal tile will be mounted, so I fill the board with a step of 300 mm. Board thickness 20–25 mm. The next strip of the membrane is rolled out and attached to the previous one. Marks are visible in the photo, the edge of the next tape will pass along these marks. Plus, the joint is glued with double-sided tape. I fastened the outer crate with 100x5 mm self-tapping screws and additionally nailed 120 mm with nails. |
 | Ridge waterproofing.
When waterproofing the ridge, the membrane must be wound in a single sheet under the counter-lattice. I did an overlap of 350 mm on each side, according to the rules, 200 mm is enough. |
 | Chimney.
It is advisable to remove the chimney even before you begin to install the waterproofing, so it will be convenient for you to bypass it. |
 | Finished roof.
I decided to make the roof of the house out of metal tiles. One of the standard sizes of a metal tile sheet is 6 m, just under this size, I made rafters. You can choose any other type of roof, by the way, the most affordable option is slate, but it will have to be changed in 10–15 years. |
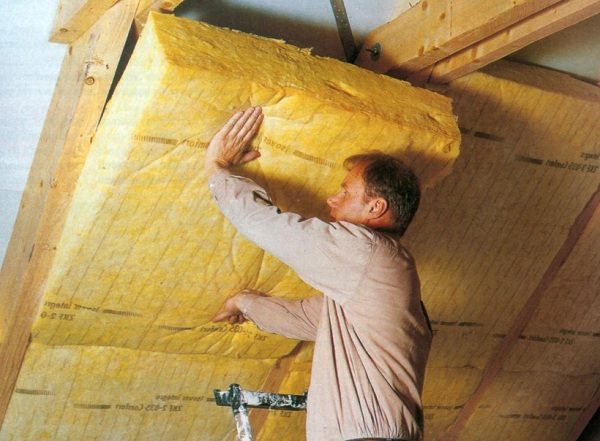 | Warming.
You can insulate the roof in different ways, I laid dense slabs of mineral wool between the beams, and sewed everything up with a layer of vapor barrier on top and stuffed the lining. Instead of cotton wool, foam boards can be used, but this insulation does not let air through.
|
Conclusion
Perhaps the detailed instructions that I wrote above are not ideal, but I succeeded, which means that you will succeed too. The video in this article will help you understand this topic in more detail. If you have any questions, write in the comments, such a discussion will benefit everyone.

Did the article help you?