 Slate fencing is perhaps the most economical option available on the market. And if you build a slate fence with your own hands, then such a fence will cost you almost nothing. That is why this method of arranging a summer cottage is often chosen by the owners of country houses. The construction of a slate fence will not take much time and will be within the power of any owner who likes to have a hand in ennobling his own dacha.
It should be borne in mind that slate is a rather fragile material, and its main purpose is laying on the roof as a roof, so it is better to build a slate fence in places with a minimal risk of mechanical damage, and also where there is no need for capital protection against penetrations.
At the same time, such a fence as slate roof, is able to serve for a very long time, given that it does not care about precipitation, temperature changes and solar radiation.
Naturally, slate is inferior in its technical characteristics to most materials for building a fence, but we should not forget that its main purpose is still roofing.
Such a fence would be, perhaps, an ideal option as a temporary fence of the site.
Materials for the manufacture of slate fence
Often a fence made of wave slate or flat material is erected based on the materials that are available.
We will indicate an approximate set of structural elements that you need to focus on:
- steel pipe 100 mm in diameter;
- wooden beam 130*50mm;
- steel corner 85*50mm;
- bolts or studs with M10-12 thread;
- nuts for the specified bolts (studs);
- self-tapping screws for metal tiles (with a 6-sided head);
- concrete mortar;
- actually flat or wave slate.
The dimensions of the pipe, beam and corner are approximate and may be different, the main thing here is the fulfillment of the conditions for the strength and reliability of the fence.
How to build a slate fence
So, how to make a slate fence:
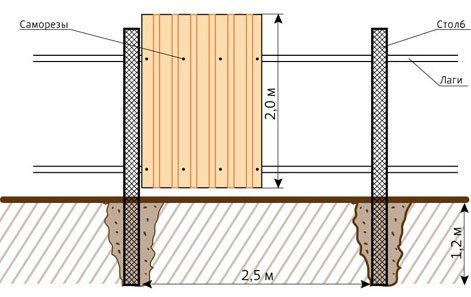
- Installation usually begins by digging holes under the posts at least 2 bayonet spades deep, as with the device bed of slate.
- The pipe is cut into segments of the desired size equal in length.
- Further, holes are drilled in the pipe for fastening a metal corner and a bearing longitudinal beam, to which the slate will subsequently be attached.
- The part of the pipe planned to be placed in the ground is treated with a special anti-corrosion solution, coated with molten bitumen diluted in a small amount of solvent (or diesel fuel) or painted with oil paint (bituminous varnish, enamel).
- After laying the pipe in the pit, the latter is poured with concrete mortar and carefully rammed.
- Then the pipe is set in a strictly vertical position in terms of level and fixed with props. In the process of drying concrete, check the position of the pipe for verticality and, if necessary, correct it.
- First, 2 extreme pillars are mounted, after which a rope is pulled between them and the remaining pillars are installed, equal to the rope.
Advice! At the end of the installation of the pillars, it is recommended to stop all work for at least 2 weeks to allow the concrete to dry completely. If the deadlines are running out, work can be resumed in a day (after the concrete has set).
- A wooden beam and metal corners are attached to the poles with the help of studs (bolts). The corner is cut into segments equal to the diameter of the pipe and a hole for the pin is drilled in its larger shelf.

Flat slate fence - The beam and the corner are mounted in pairs: the corner is from below, the beam is put into the corner, after which it lies on the corner from above.
- A hairpin connects and pulls together a bar, a corner and a pole. In this case, 2 bearing guides are formed - from below and from above.
- The beam at the ends is connected by a special method, which in the carpentry industry is called an end connection with a straight overlay half a tree, then they are tightened with self-tapping screws (studs, bolts) at the junction.
- With the correct implementation of the entire previous procedure, they begin to fasten the slate to the wooden beam using self-tapping screws.At the same time, they also pull the rope between the extreme posts as a guide and align it according to the level in a strictly horizontal position.
The first slate sheet is installed with particular accuracy, since it sets the general direction of the rest of the row of sheets and the entire fence. To fasten one slate sheet, from 4 to 6 self-tapping screws are used.
When laying wave slate, the half-waves at the edges of the sheets are made different to ensure their better overlapping.
For this reason, when installing the following sheets, special attention is paid to the correct coincidence of the edges, in other words, the beginning of the next slate sheet should be a continuation of the end of the previous one with minimal overlap.
At the end of the construction of the fence, it can be painted with some bright paint, which will give it a nice appearance and protect the details from precipitation.
A fence made of flat slate or its “wavy counterpart” combines both simplicity and low cost of construction, as well as sufficient strength and durability. Therefore, it will be able to please its owners with the originality of the idea and its practicality.
Did the article help you?